Friday, May 11, 2012

Day 5 New York Shoemaking Course

It's been another great day on the course (hope you agree guys) and we are only hours away from the first channels being cut and the soles going on. I am looking forward to a good day of sole stitching tomorrow so that next week there will be plenty of time for questions and answers with Mr Ducker as sole stitching is finished and heels are built. 


 Hopefully there will also be plenty of time for finishing - getting a really good edge on the soles and heels. I'm expecting to see great results in the final group photo next Saturday! Tomorrow, a last post from me before Mr Ducker takes the reins on Monday, so happy shoemaking until then.

Day 4 NY shoemaking course

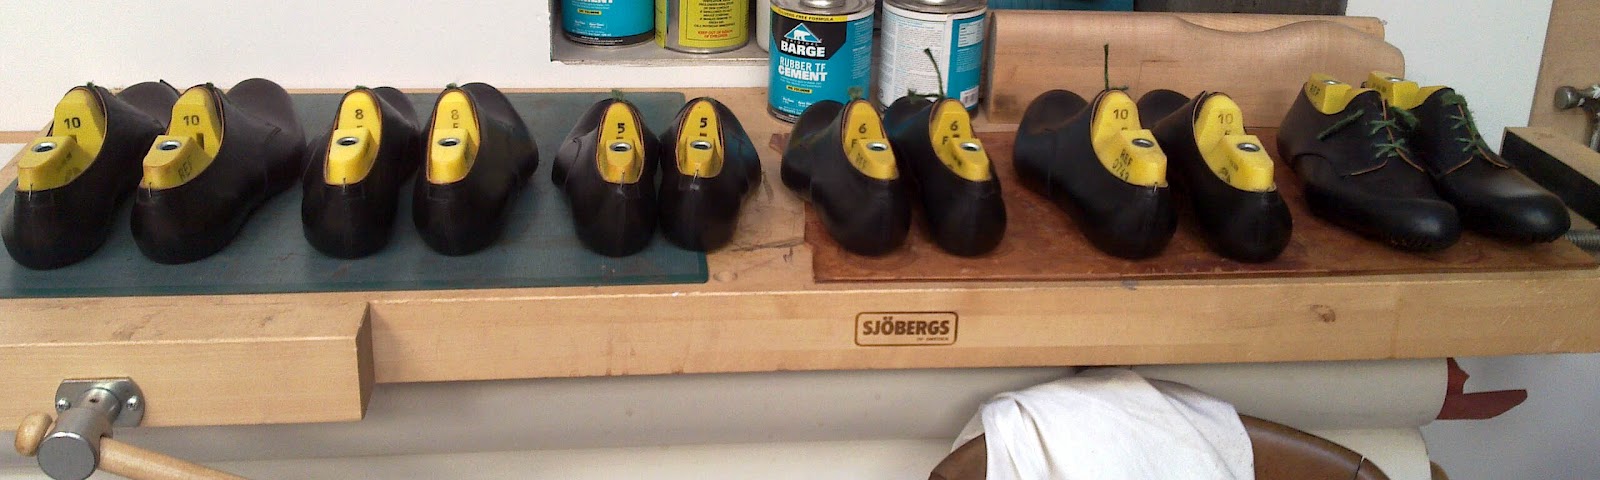
The day started with a lovely line up of shoes - and we can call them that now - all lasted, stiffeners and toe puffs in and ready to welt.


 Then with threads made the welting was under way. We've had a day of bristle slippage for some of the students which meant much careful unwinding, re-keying and tarring of the bristle and re-winding. Frustrating, but VERY good practise. James will be teaching them all another way to attach bristles next week which might work better for them.

And the day ended with one shoe welted and 5 others almost done...so everyone has gone home with some welting homework! We shall see how they fared in the morning!

Wednesday, May 9, 2012

And Then There Were Six - Day 3 NY Shoemaking Course

The enthusiasm and energy is still high even though bodies and minds are stretched having learned so many new skills (and words) in such a short space of time. We now have six pairs of lasted shoes all set to welt in the morning and how proud I feel about the hard work that has been done today.   

 If you are following closely you may be wondering what happened to our seventh student? Well unfortunately, a recent operation meant that he just wasn't fit enough to undertake the course despite some impressive determination. We are instead looking forward to welcoming him back next year, fully recovered and fighting fit. It is disappointing all around, but emphasises just how physical this course is, working your legs, arms, hands and entire upper body all at once.


 Talking of which, we're welting tomorrow, so our students will get to do their first stitching. Fingers crossed for some easy awl action!

Tuesday, May 8, 2012

Day 2 New York Shoemaking Course 2012

Today we ploughed on with yet more skiving toe puffs, stiffeners and preparing insoles. Most of the group have also got their welts prepared, threads are under way and once all these bits and pieces ready, we'll be ready for a day of lasting and welting tomorrow.
Wright had a major breakthrough today. As the only 'leftie' in the class he has been struggling to get his knife under control and sharp. It's been tricky for me to show him too, as I am right handed, but finally we have a sharp knife that is doing what it needs to and with a little more practise he will be ready for the next knife challenge!

With four guys and three girls in the class, there has been some amusing leg pulling about the girls vs guys approach to work. Whilst the girls have been quietly getting on with things the guys have needed a lot of attention and then are surprised when the girls are on to the next step! Needless to say it's made a fun and lively class!
But the flip side of such a sociable group is that sometimes concentration can wander, so there have been a couple of slip ups today. Not the end of the world and with all things that go wrong, good learning!
 So after a good night's rest, we'll have seven pairs of shoes taking shape tomorrow - all lasted and a few at least partly welted. I can't wait. Good work guys!


Monday, May 7, 2012

Day 1 New York 2012 Handsewn Shoemaking Course

 It's day one of our handsewn shoemaking course in New York and we've got a full house - 7 students - and it's been a great first day...buzzy, sociable but with lots of work getting done and new skills being learnt! The perfect combination!
 For most of the students this is a totally new skill set which can be quite intimidating...but by the end of today knives were being wielded confidently (sometimes too confidently!) the insoles are on and drying and puffs and stiffeners are well on the way to completion.


Tomorrow things get more exciting as the insoles are prepared, the holdfast is made and uppers are lasted. My favourite day as the students see their bits of leather take on the shape of real shoes!


Friday, May 4, 2012

Threads

Greetings once more, acolytes of the sole. We hope you have had a wonderful week. We have had an interesting few days. Our New York shoemaking course starts on Monday and we boxed up all the tools and materials as per usual and tried to send it all on Wednesday, only to get a frantic call from our courier saying the airline would not transport the tools because they are hazardous (the tools apparently are a security risk). Yes, I can see terrorists attacking a freight plane with a fudge wheel. But there you go. So we had a mad and very stressful 24 hours finding an alternative carrier who would get the box there in time. Fortunately it was collected yesterday and should arrive this afternoon. Fingers crossed! And breath...

Last week at Gieves we had an event celebrating the centenary of the expeditions of Scott and Amundsen to the South Pole. Gieves and Hawkes were funders of the original Scott expedition and did the same last year. A group from the Army went to Antarctica and half of them followed Amundsen's route and half Scott's. They followed the exact routes and arrived on the same days as the original explorers 100 years ago.
We had the leader of the whole expedition in the store to give us a presentation about their expedition. It was a really fascinating insight into the most inhospitable wilderness in the world. It was absolutely amazing and those guys are as tough as old boots.


And so to things shoemaking. One frequent problem we shoemakers encounter is decent thread for welting and stitching soles. When I was an apprentice at John Lobb, we used linen yarn from Ireland. This came in balls and was a very pale cream colour. It was light and very strong.

The important thing to look for in any yarn for shoemaking is the length of the individual fibres that make up the yarn. The longer the better. In the Irish linen, the fibres were long which gave the resulting threads a lot of strength. It also means that you can untwist the yarn and break it giving yourself lovely long tapers. A few years ago, they changed the "recipe" for the linen and it no longer broke giving long tapers which made it impossible to use because you couldn't attach the bristles securely.

So, we had to find an alternative. After a lot of searching, we finally found the hemp thread which we use now. It is not as good as the linen used to be, but it is still good. It is a little courser and thicker which means we use fewer cords per thread, but it seems to stand up to wear and is strong. It breaks nicely, the fibres being 2" to 4" long, giving a decent taper for attaching bristles. And as long as you use a lot of thread wax and burnish it well, it makes a very decent shoemaking thread. 5 or 6 cords for welting and 3 for stitching soles.

This is what it looks like.


This is a 3 cord stitching thread before I twist it and put on the wax. You can see the tapers on the 3 cord ends.


When you are breaking the yarn, you have to hold one part firmly and roll the other part down your leg until you can see the fibres are all parallel and in line. At this point, you can tug the cord and it will break in to the desired tapers.

See how it is done in the video - I know, technological, huh?


If you are looking for decent thread, we sell it. We have 250g spools for £20. This is enough for about 20 pairs of shoes, so it is not expensive. Email us if you are interested.

There are pre-made synthetic threads on the market and people say they are very good, but my view is that our shoes are a natural product made in the traditional way and we should make every effort to maintain the traditions of our trade. I just prefer using natural products. Simple!

That's all folks! Until next week, when we will be doing our daily reports on the shoemaking course, happy shoemaking!

Friday, April 27, 2012

The Tools I Use 2

Another week flies by. Where does the time go? Just realised that our New York shoemaking course starts in 2 weeks! Really looking forward to it. Deborah is teaching the first week and I am there to do the second week. We have a full house of 7 students and a good mix of men and women, so all in, it should be fun.
We will do our regular daily posts during the course to document what we do for those of you who might be thinking of doing it in the future.

First off, great piece in milanstyle.co.uk featuring us

http://www.milanstyle.co.uk/blog/mr-hare-shoesnob-carreducker/

Last week's post about tools proved very popular, so I am going to continue with it this week. I showed you last week the basics of a peripatetic shoemaker's tool kit, but without describing in any detail each tool.
So this week I am going make more detailed descriptions and give useful tips for those of you who are trying to create your own shoemaker's tool kit.

First up is the rest of my edge irons. As I said, I travel with a basic set, but have all the intermediate sizes and the very large and very small ones on a box, along with some extreme sized seat wheels - only brought out on the odd occasion.


So, some specifics. This is my fudge wheel. I bought this when I lived in Spain. Two things to look out for. One, the teeth on the wheel should be sharp and defined. Very old fudge wheels become worn and do not mark the stitches so well. Sharp teeth give a very defined mark on the welt. The other thing is the size. Most fudge wheels have the number of stitches to the inch marked.


Remember to look at the front edge too. New ones can be very sharp and will scratch the upper when you run it round the welt. If you have a sharp one, grind it a little with aluminium oxide paper to take the sharpness off.


What I love about my Spanish one is that it has two other different interchangeable wheels, so it is like three in one. Mine do 9, 12 and 15 stitches to the inch.


Ok, next is the plough, used for taking the lip off the insole and the welt after finishing, before you set the edges. Important to keep it sharp. I use the strop.


This is similar to the plough but is called a feathering knife and is used specifically for cutting the feather or holdfast. That 90 degree step part creates an even cut which is great for the welt to sit in.
PS Thank you to Marcell Mrsan who generously gave me this tool.


But, with both the plough and the feathering knife, you can do the same jobs with your knife. People spend endless amounts of money and energy collecting every tool under the sun, which, if that is what you are into, is fine, but lots of times, it is a total distraction. Your energy would be better spent making shoes and improving your skills. Using the knife well is the core skill of shoemaking and you are better getting good with it than spending time and money on the search for tools which often aren't available and, if they are, are of inferior quality. New tools don't cut it a lot of the time.


Next up is my very favourite Japanese rasp. These puppies really are the Rolls Royce of rasps. Small teeth which last for years. I've been using mine for at least 5 years and it is still amazing. Again, other new rasps I have found are rubbish!


Next up is the daddy, the knife. Nurture it, pour your love into it and keep it sharp! It is your best friend and sometimes, when blunt, your worst enemy.
We always put a leather sheath on it for comfort and to stop your hands getting black.
BIG TIP for those black fingers from the knife. It is water from your hands and the leather oxidising the steel. The answer is lemon juice or, even better, citric acid - it is like magic, honest!


Broken awl sharpened to make the groove in the channel for the stitches to sit in. Very important to stop the stitches showing through the sole.


From left to right, the seat wheel. Purely cosmetic little lines around the seat. Old ones are best. When they are cold, the wheel does not move, but warm them on the burner and it should start turning. If you have an old one, try taking out the screw, cleaning it and putting a drop of oil, then replacing it. Should do the trick. Note the position of thhe wheel before you start this process.

Next is the edge iron for setting the edges. Should be smooth and clean. There is a double lipped edge for the welt and a single lipped edge for the sole.

Last, a single lipped iron for setting the edges of the heel. I ground a regular edge iron on a grinding machine to make mine.


Waist irons for bevelled waists. Don't even go there unless you have someone there to teach you.


Right, you want to make shoes and you are buying old irons from Ebay, for example. Quite often,they will have been sitting in a garage or shed for years going rusty, like the ones below, so what do you do? They are salvageable.

Get some aluminium oxide paper and start polishing the surface - gently! Start with something like a 120 grit and work up to about a 240 or finer. Aim for a glassy, flawless finish.


Once the surface is clean and smooth, you need to work on the grooves - very important to get a good edge.
You will need a junior hacksaw blade like the one below. These are great for sorting out the grooves on the edge iron. Before you start though, you will need to flatten the blade on a lap iron because it has a zig zag form which will make the groove too wide. So just take the blade and hammer it on the flat surface of the iron. Then run it in the grooves and they will become smooth and deep - perfect!
Junior Hacksaw

Junior Hacksaw Blade


Lap Iron

Hammer On This Surface

The lap iron is an important piece of kit and we use it for hammering the sole before stitching it to make it dense and long lasting, and we use it to make the split lift/rand. Easy to find at flea markets and Ebay.

And that is it for this week. Hope you enjoyed the post and look forward to more next Friday when we will be looking at other tools in the workshop . Until then, happy shoemaking!