Occasionally, (our shoes are very durable!) we get some old shoes back for repair. This is always an interesting moment because you can see how your making stands up to the way people walk in their shoes. This week we had three pairs back from one of our first customers from 2004. So these babies are 9 years old.
We assessed what needed doing and let the customer know. We only repair our own shoes, so it is not something we do very often. Two of these pairs needed a complete resole and one a general service which includes some or all of the following - top pieces, toe plates, laces, sticker sole and polish
We started with the simple wholecuts on the right. They were the most worn (and loved hopefully)
The sole was very worn, but still wearable. Notice the wear backwards from the joint - this means a new shank to give some more support.
You can see here how worn it was. This sole was originally a 1/4" but is now less than 3/16"
Before you start, you will need one of two things - the original lasts back in the shoes, or a pair of well fitting wooden trees. We use the bespoke trees we provide with the shoes.
The process starts with removing the heel. The top piece is thrown away and will be replaced with a new one.
Weirdly, some repairer he had used had put the top pieces on with the quarter rubber on the inside instead of the outside, so the leather had worn away, not the rubber part. Always go to someone who knows what they are doing!
Now to remove the heel. It is important to keep all the heel lifts as you remove them because you need them to build the heel again once you have stitched on a new sole. This way you can just put the heel back together and it will be balanced and correct. If you use new lifts, you have to do all the skiving and balancing again.
The general technique is to prise a lift at a corner with a screwdriver and then pull it off with some nippers. Be careful not to damage the lifts.
This is where you will be glad you used paste and nails not neoprene/contact adhesive. You always have to think about repairs when you are shoemaking.
Label the lifts L1, L2, L3 and R1, R2, R3 so that you know which is which. Store them safely.
Stop when you get to the split lift/rand.
Gently peel back the split lift/rand, but don't remove it completely.
Fold it back and nail it into position. This makes life much easier when you come to rebuild the heels.
Next you have to remove the sole. Usually the stitches are worn at the toe so you don't have to cut them. Once you have started the process, it is fairly easy. If need be, use the knife to cut the stitches but be very careful not to cut the welt.
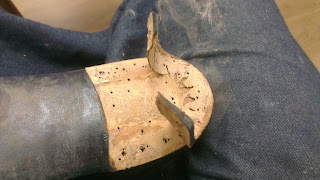
Peel the sole back to the heel, like this. And then cut the sole at an angle like in the picture below. Make sure you have removed any nails first.
Remove any bits of stitches which show up above the welt so that the welt looks like this. Don't try to remove the stitches from the top of the welt. You will simply restitch over the top of them.
At this stage you should check the shank and the filler. We use leather shanks and we put a new one in to give it some extra rigidity. We used felt filler here and it was fine. Cork will need replacing after so long.
Soak and mellow your sole (you should have done this the day before really). Cut it out to size. You will need to cut a bevel at the heel area to match the one you cut on the original sole so that they dovetail together.
If you are making a sole to a specific thickness, you will need to skive the edge.
Hammer the sole with a flat headed hammer so that it lasts longer.
Glue it into place, making sire the heel join is neat. Put a few nails in to secure it
Trim it to size.
Cut your channel.
And stitch, baby, stitch! Remember to stitch through the original hole in the welt, otherwise the welt be be destroyed. Also, be careful when taking out the awl from the hole to avoid pulling out the original stitches and making the welt look fuzzy.
Next week we will build the heels and finish the repair. Until then, happy shoemaking!


