Right, so here we are back in London after our interlude in New York. The class was a great success and the lovely Lauren said something really fantastic. She said,
"I learned more in 2 weeks with you than I did in a year at LCF"
Praise indeed. It must also be said that while in America we discussed available shoemaking classes on the market and it seems that they are generally short, expensive and cemented.
Our ethos here at carreducker is to promote the craft of handsewn shoemaking which is why we do the course in the first place. And while we want to make a profit, we also try to make the courses as affordable as possible, so that the maximum number of people can do them.
If you think about it, £1650 for 96 hours in the classroom, plus £150 tool kit, the shoes you make, and top quality materials is a very reasonable price. Plus you are learning with genuine master craftsmen who have learned the craft the traditional way as apprentices.
What are you waiting for?
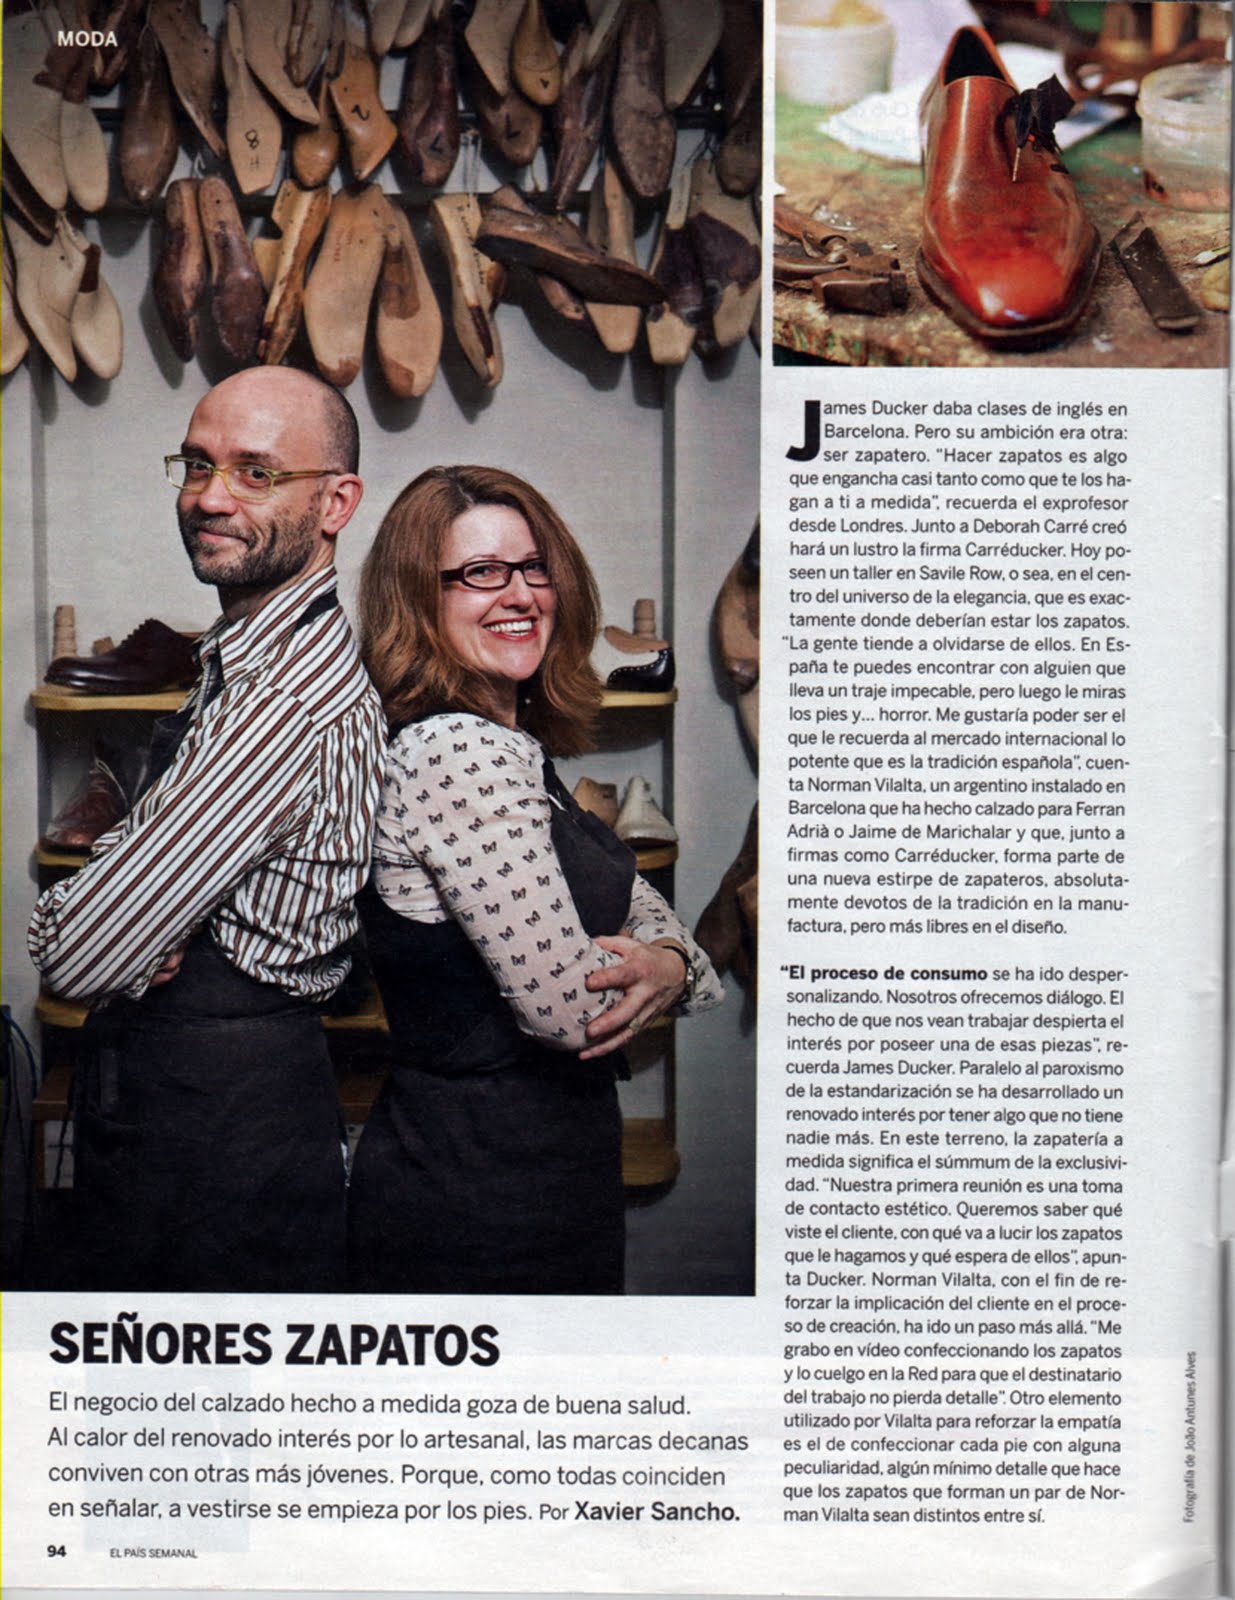
Nice bit of press for us. One for all you castellanoparlantes out there. Article in El Pais Semanal.
But back to all things shoemaking and bespoke shoes. Remember a few weeks ago I started a post about the story of a bespoke pair of shoes from start to finish and I had chosen a pair of velvet slippers? I had left them all lasted over, ready to put the sole on.
Remember also that this construction is unusual and not one I have done very often. So when I do do it, I find it a bit nerve wracking and I have to concentrate. I imagine it is how a lot of you feel when you are making shoes and it is good for me to remind myself of how it feels.
After the upper is lasted over, don't trim any excess off. Glue it down with contact cement and then brace stitch it on. This is where you use one thread and just stitch over the upper and through the insole. The result is in a pic below and I have done a post about it - the one about preparing for fittings/try-ons.
I also put on covers as they are velvet (see post archive)
Remember we had taken a paper outline of the sole? Well, put this on a piece of paper and draw round it. Mark your heel points. Give yourself lots of extra round the heel.
Next give yourself a 6mm margin around the line. This is to account for the insole and upper that is now on the last. You want to make sure the sole is too big rather than too small for the slippers.
Draw the sole outline on your chosen sole material. This should be thin and mellow so you can work it (soaked and 75% dry).
Cut it out and skive it to 1/8" by drawing a line around the edge with a pen. This is from heel point to heel point.
Skive it carefully making sure the skive is not too abrupt. Blend it in from a good inch from the edge. Glass it to get rid of perfections.
At this point it is a good idea to test the size on the slipper. It needs to look like the sole is too big for the shoe, like it will turn up slightly beyond the feather edge.
Draw a line 3/16" in from the edge. This is where you are going to stitch the sole on.
Wet the line with water.
Now here is the fun part. With a welting awl (it helps if you have a very curvy one, I keep one specially for this purpose), you have to make a series of holes on the line by going in and out with your awl. Let the awl do the work as the curve will bring it up again. And don't try to go too deep. This construction is for house shoes and dress pumps and is not supposed to be a rugged construction for walking up mountains in.
Take you time and practice on a bit of scrap first.
Make the holes close together.
It should look like this.
Glue both surfaces with contact cement and let it dry for 15 minutes. You only get one go with this glue so get it right when you put them together.
Hammer the sole gently to make sure it is well glued.
Hammer the edges hard to make them fold up against the upper.
This is how the brace stitch looks.
Nail around the heel as normal - nails half way in; clip them; and punch them. Pegs if you prefer.
Now the fun bit. Wherever you have a stitch hole on the sole, you need to make one into the upper. Do it as you stitch, one at a time.
On the first stitch put your thread into the first holes in the sole and the upper. You are ready to start.
Make your upper hole and reopen the sole hole.
Put your sole thread through the upper hole and pull it leaving a loop. Twist this forwards one turn. Then put the upper thread through the loop from the sole side towards the upper side.
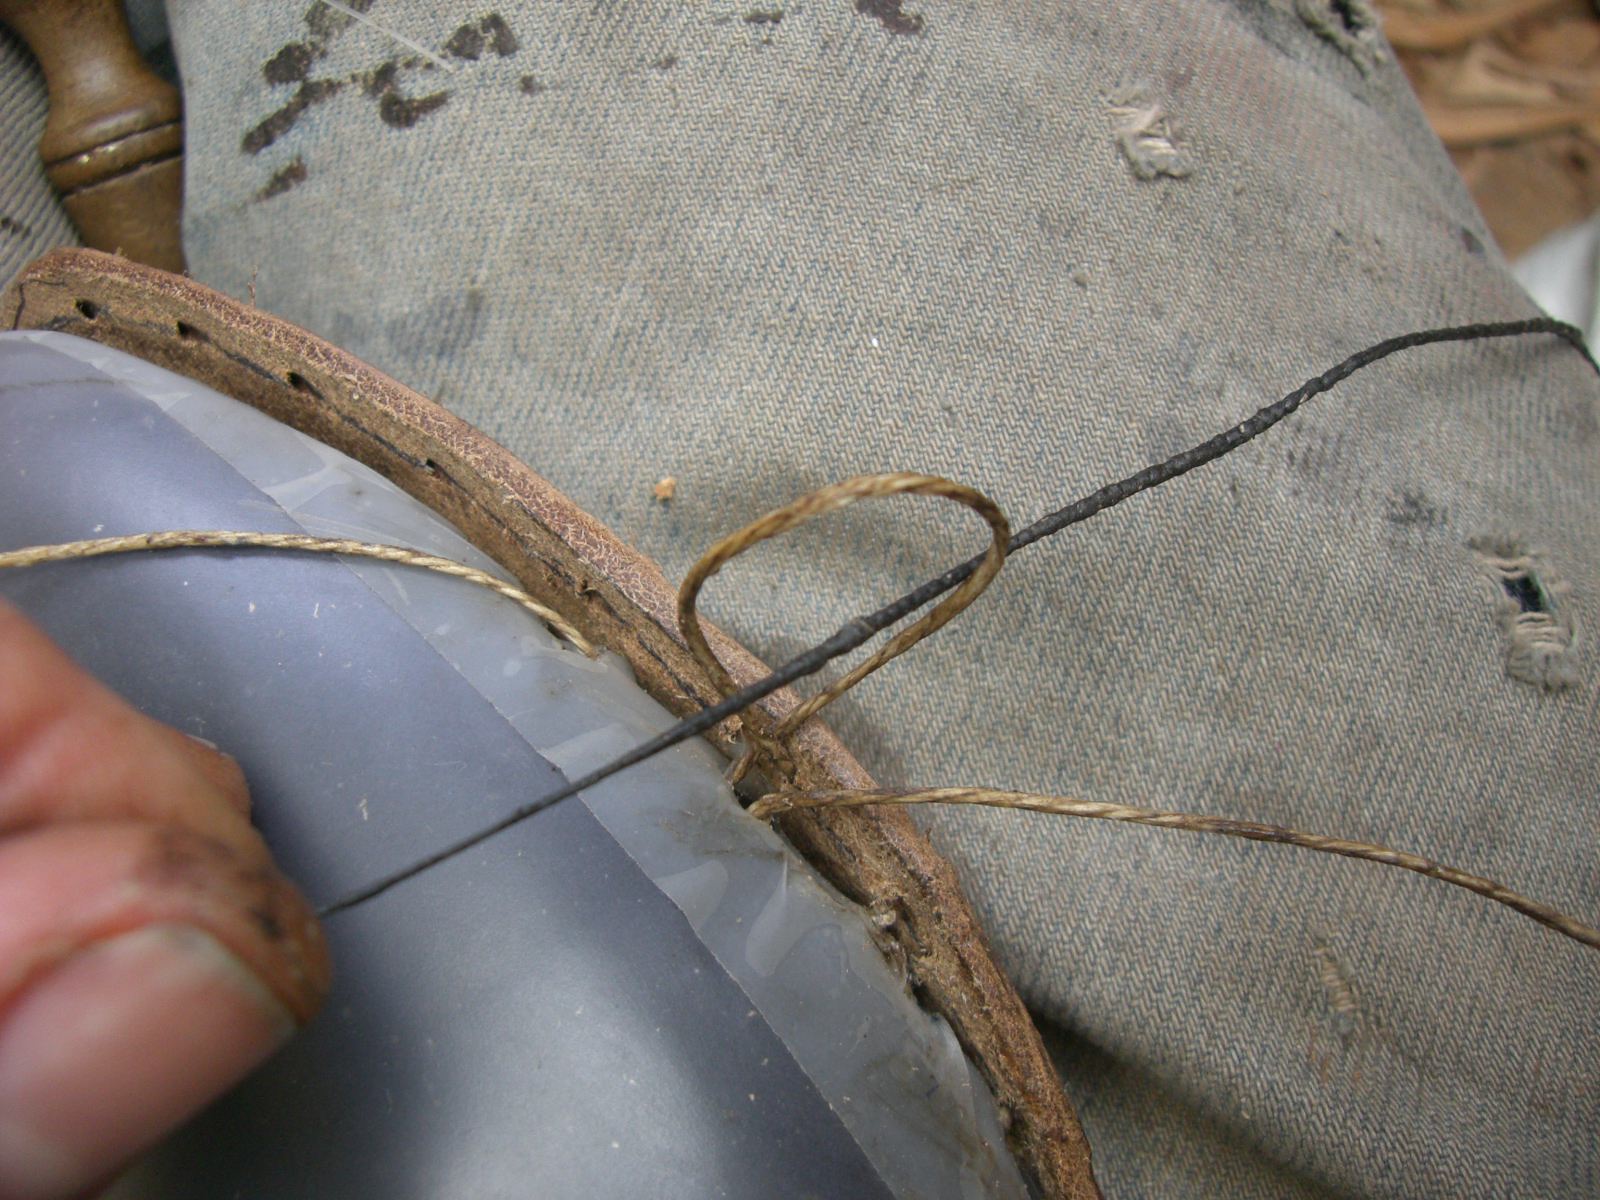
Then put it through the sole hole. Pull tight. It forms a little holding knot. Pull both threads tight and either with the handle of your awl or with a hammer, hammer the sole to flatten the stitches, all the time pulling the threads tight.
Keep going till you finish. Remember to hammer as you go.
When you have finished, skive the sole edge to 3/16".
Wet the edge and peen it in with the French shape hammer. Try to get it as tight as you can. Hammer out the marks with a flat hammer.
Then draw a line to 1/8" and cut it with your very sharp knife. You can use a thin piece of plastic under the leather to protect the upper.
This leaves an ugly edge. Yuck!
Trim it off with the tip of your knife.
And finally peen it right up against the upper as tightly as you can. It should look neat and straight and tight to the upper.
More pics of the finished sole next time. And I will build the heels and finish them.
I am going on holiday next week to Spain, so the Other One will be on blogging duties.
So until then, happy shoemaking
Friday, May 27, 2011
Thursday, May 19, 2011
Week Two of the Brooklyn Shoemaking Course 2011

Well here I am nearly at the end of week two and what a pleasant change it has been teaching the second week of the course. In the past I have been the one to get the courses underway, which is definitely more physically demanding - especially when we have had larger groups to teach - so it is lovely to concentrate on the finishing stages this time.
I arrived on Saturday afternoon, but my working week actually started on Sunday seeing a new client for a fitting. And it was not a fitting lacking in some glamour despite New York's attempts to dampen things with heavy fog and rain! It was my first fitting where a client arrived by helicopter (and hopefully not my last)! I tried very hard to be English about it all and to remain unimpressed, but I failed totally. I am sorry, but arriving at a meeting in your own helicopter is right up there on the super cool list. Anyway, after making such a dramatic entrance the client was actually charming, thankfully the fitting went well and we are now making the first pair for delivery.
When I had arrived on Saturday the students were just putting on their soles so Monday started with some concentration-demanding 'cutting the channel'. James has told me how well they had done in week one and how capable they all are. He is not joking!
Regular blog followers will remember what an important stage this is - cut too deep a channel and the shoe's strength is undermined, cut too shallow and the stitches show through the sole. It's funny, but even after all of these years making it is the one point when I have to take a deep breath before I put my knife into action. Anyway, James is right, our group of students here in Williamsburg have proven themselves very capable and channeling gave them no such qualms. We were soon stitching with few thread dramas and by Tuesday afternoon I was wondering what I would be doing with them for the rest of the week.
The beauty of being so far ahead in the second week however is that we can slow the pace of work right down and really, really concentrate on getting the best possible finish on each student's shoes.
Gia ,by accident or design I am not sure which, is making cuban heels and so we are working to make sure that the slopes of her heels match and are smooth;
Lauren has found her forte in heel building and rasping - so she is now working hard to keep the heel edges straight as she finishes them;

Tom, who has powered ahead throughout the course is focusing his attentions on perfecting his finishing - and he has learned that even the smallest variations in stitch depth etc. will impact on the finish of his sole edges;
and Phillip had a hard lesson today when he used too hot an edge iron/no soap to set his edges and singed them. A little extra sanding will put things right in the morning…but it just shows how the intensity of the past 10 days has effected levels of concentration and stamina. Week two may not be as physically demanding but it is demanding in other ways!

Lauren has found her forte in heel building and rasping - so she is now working hard to keep the heel edges straight as she finishes them;

Tom, who has powered ahead throughout the course is focusing his attentions on perfecting his finishing - and he has learned that even the smallest variations in stitch depth etc. will impact on the finish of his sole edges;
and Phillip had a hard lesson today when he used too hot an edge iron/no soap to set his edges and singed them. A little extra sanding will put things right in the morning…but it just shows how the intensity of the past 10 days has effected levels of concentration and stamina. Week two may not be as physically demanding but it is demanding in other ways!We are looking forward to taking a 'field trip' tomorrow to visit some of New York's leather and shoemaking material suppliers - a welcome opportunity to discuss design ideas and which leathers are more appropriate for hand sewn work - before back to the workbenches in the afternoon.
Once the lasts are out on Saturday we'll settle down to some good old polishing - I plan to show the students how to get a military shine - then it'll be celebrations, bubbly, dancing and doughnuts from the best doughnut shop in NY.
Back to good old blighty for me on Sunday after a short, but very sweet trip.
Jesse has been a great host as always and been very generous in sharing both her studio space and her experiences with the students. I hope that her enthusiasm and their experiences over the past two weeks will encourage this lovely group to take their shoemaking studies even further. Good luck guys!
Friday, May 13, 2011
carreducker Shoemaking Class, New York 2011
Apologies to one and all. There are two very good reasons why I am blogging so late.
The first is that the Blogger server has been out of action for the last 24 hours and only came back online this morning. Conspiracy theory anyone?
The second is that I am in New York and when Blogger came back to us (finally), I was already teaching the carreducker handsewn shoemaking class and had to wait till the end of the day to write today's post.
So here we are, in very sunny, warm Williamsburg, Brooklyn, hosted by the lovely Jesse Moore, bespoke shoemaker.
I have taught five days of the course already and I have to say that this group is probably the most capable one we have ever had.
There are four students this year, so there is plenty of time for individual tuition, as always, and all of them have had some shoemaking experience before. The class caters for complete beginners, but when everyone knows one end of a shoe from the other, it helps move things along at a jaunty pace.
We have sharpened our knives; prepared our insoles; skived toe puffs and stiffeners; lasted by hand; made threads; and welted by hand. We are about to start attaching the sole.
The most difficult processes are behind us and the second week should be a pleasure for the Other One, who arrives tomorrow to do her stint.
We have a student from New Zealand, one from Florida, one from Detroit and one who walks across the Williamsburg Bridge every morning from the Lower East Side.
A really nice group and it's really great to have a week of teaching. I genuinely enjoy it. A combination of motivated students and the pleasure of sharing my skills make this a week I look forward to every year.
Here are a selection of images from the week.
So there you are. Hope you enjoyed the post. I go home Sunday and will spend next week at Gieves and Hawkes.
Until next time, happy shoemaking!
The first is that the Blogger server has been out of action for the last 24 hours and only came back online this morning. Conspiracy theory anyone?
The second is that I am in New York and when Blogger came back to us (finally), I was already teaching the carreducker handsewn shoemaking class and had to wait till the end of the day to write today's post.
So here we are, in very sunny, warm Williamsburg, Brooklyn, hosted by the lovely Jesse Moore, bespoke shoemaker.
I have taught five days of the course already and I have to say that this group is probably the most capable one we have ever had.
There are four students this year, so there is plenty of time for individual tuition, as always, and all of them have had some shoemaking experience before. The class caters for complete beginners, but when everyone knows one end of a shoe from the other, it helps move things along at a jaunty pace.
We have sharpened our knives; prepared our insoles; skived toe puffs and stiffeners; lasted by hand; made threads; and welted by hand. We are about to start attaching the sole.
The most difficult processes are behind us and the second week should be a pleasure for the Other One, who arrives tomorrow to do her stint.
We have a student from New Zealand, one from Florida, one from Detroit and one who walks across the Williamsburg Bridge every morning from the Lower East Side.
A really nice group and it's really great to have a week of teaching. I genuinely enjoy it. A combination of motivated students and the pleasure of sharing my skills make this a week I look forward to every year.
Here are a selection of images from the week.
![]() |
| Phillip lasting |
![]() |
| Tom getting ready to put his stiffener in |
![]() |
| Gia measuring up |
![]() |
| Lauren lasting |
![]() |
| Brooklyn industry |
![]() |
| Welting |
| Our lovely studio |
| Jesse closing |
![]() |
| Welting up close |
So there you are. Hope you enjoyed the post. I go home Sunday and will spend next week at Gieves and Hawkes.
Until next time, happy shoemaking!
Labels:
welting
Friday, May 6, 2011
Catching Up With Old Friends and Making New Ones
Mr Williams of Men's Flair popped by to say hi and captured a rare moment - Mr Ducker AND The Other One together in the goldfish bowl!
Good to see you Mr W. Catching Up With Old Friends and Making New Ones and we'll see ;)
Star-struck
A big "thank you" to GQ for the above accolade in the hot, hot hot June issue (p.128). With a front cover featuring the beautiful and undeniably hot Ms Cruz, in an article profiling hot property Mr Campbell Bower and on the same page as the undeniably cool (and hot) Mr Johnny Depp...what can we say...we're thrilled! Go buy it!
Velvet Slippers
Good morning (afternoon, evening, delete as appropriate) fellow shoemakers of the world, including you wonderful Eritrean ones.
I am going to NYC on Sunday to teach our annual New York shoemaking course. I always enjoy being there, so I am looking forward to it. Next week I will post some images and give you a progress report.
I went to a friend's 50th birthday party on Sunday and received some wonderful feedback from an old friend about the blog. She has nothing to do with shoemaking but still enjoys it which is really marvellous. I also had a fan in to Gieves and Hawkes yesterday who came by to meet myself and Justin, aka The Shoe Snob, so thank you for that, you know who you are! It means a lot to an old blogger like me, as it can be quite a lonely activity.
This week I am going to approach it slightly differently. I have decided to start with a shoe and just take you through the whole process from start to finish, commenting as I go. So here goes, wish me luck.
I have chosen a slightly unusual shoe which might throw up some challenges. It is a monogrammed velvet slipper. This requires a different construction to the traditional welted shoe and is a method which could apply more to those of you who use a cemented construction.
You start by blocking an insole as normal and letting it dry. Trim to the feather edge and cut off the lip around the feather edge. This can cause pain to the wearer if you don't do it. I use a plough, but you can use the tip of your (sharp) knife.
Cut the waist quite full and don't pull it in too much as you will not be able to stitch if you do.
At this stage take a paper template of your insole. This will come in handy when you come to prepare your sole. Because I don't do this very often, it is a difficult make for me, so I like to get all the help I can. If I dont use the template, I tend to make the sole to small and it looks bad.
Do it for both lasts as they might not be the same.
Skive your toe puffs and stiffeners in the same way as normal. You will need long stiffs in side and out because this is essentially a casual shoe (no fastenings) and needs the support in the quarters.
When you are ready, paste the skin side and put it into the space between the lining and the upper.
Then paste the other side and glue it all together.
Use side linings too, to give support along the sides of the slippers. Glue each side of the tip and place them between the lining and the stiffener. Make sure they are lined up correctly to follow the lasting allowance of the uppers.
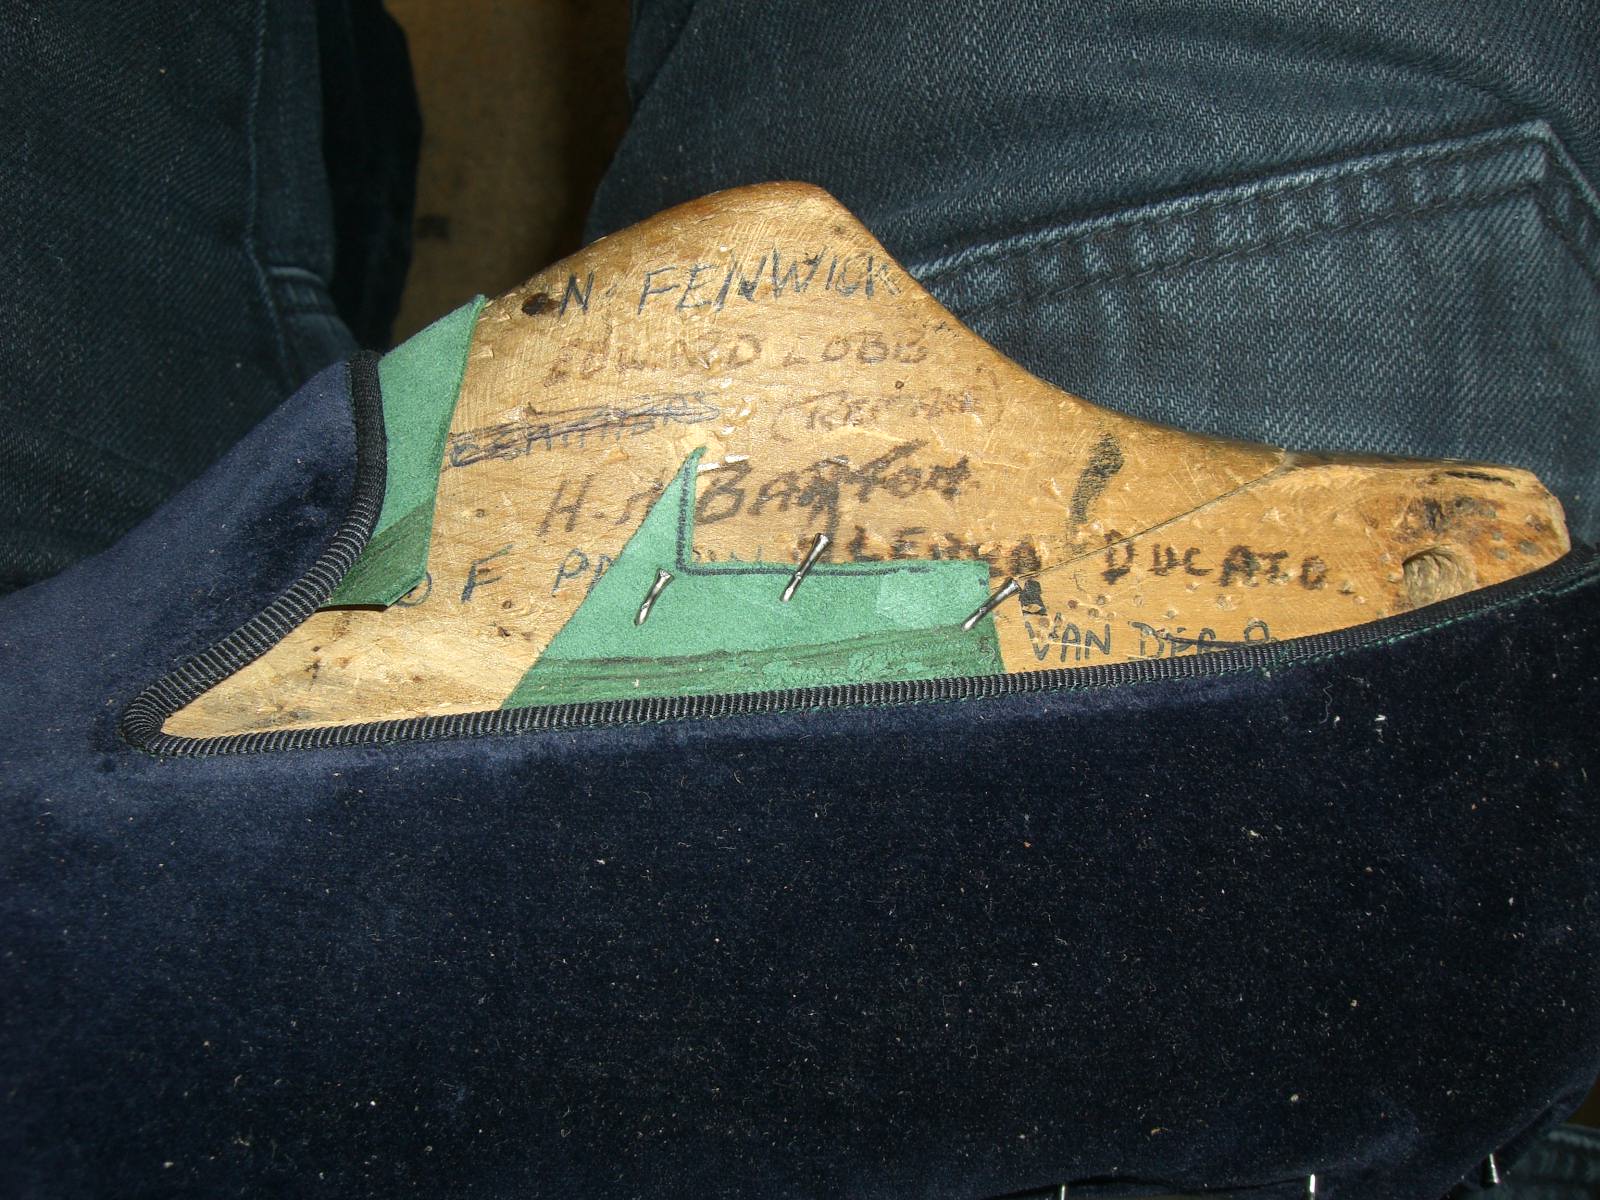
Now, time for lasting. Place the upper on the last. Don't use chalk/talc this time because it is a satin lining and it will ruin it. Make sure you leave about 1cm above the last as you can see below. You can put a nail into the centre seam at the base of the last to keep it on place if you need to.
With your lasting pliers, pull down the front. Put one nail in the centre at the front and then four more , two on each side. At this stage, it is just to make sure the upper is positioned correctly and straight.
Adjust as necessary and when you are happy, do the other one and make sure they are a pair. Measure the positions of the monogram to make sure.
Once you are happy with the fronts, pull down the back to the back height mark (2 and 3/8"on the last) and put a nail into a seam,being careful not to damage a stitch.
Because this is a casual and has straight top edges, the closer usually leaves tabs on the lining to help keep the top edge straight. Put some nails in these.
Last the back part as normal, pulling and nailing as you go, a little on each side in turn. Continue till just behind the joint.
Make sure you get rid of the creases and hammer everything down at the end.
Now the forepart and the toe puff. Take out the nails at the front and relast the lining, nice and tight..
Mark the position for the puff on the lining - 2.5" - and draw a line. Paste the whole front part and under the feather edge where you will last the puff over and nail it.
Last it as normal - 2 nails on the top, 2 at each end, and then 1 in the middle, continuing 2 on each side untill you get to the end. It should look like this.
Let it dry and then take the 2 nails out of the top. Rasp it smooth and shape it to the last. Make sure the other one is the same. Remember it's a PAIR of shoes!
On the bottom side, cut away the excess with your knife and rasp it flat. This is important.
Attach the side linings using contact adhesive. Cut and rasp them into shape, like this.
You are now ready to last over the front of the upper. Follow the same procedure as before.
Normally, in a welted shoe, I would trim off excess upper before I hammer down the nails, but in this case, I leave it full because you will use this excess material to brace the upper to the insole in the absence of a welt and a holdfast/feather.
This seems like a natural place to take a break. Next instalment will be in 2 weeks after I get back from New York. I will be bracing the upper on and preparing the sole for a pump stitch construction. Contain yourselves please, you will just have to wait!
Until next week when The Other One will be taking over the blogging mantle 'for one week only', before she joins me in new York for week two of the course. Happy shoemaking!
I am going to NYC on Sunday to teach our annual New York shoemaking course. I always enjoy being there, so I am looking forward to it. Next week I will post some images and give you a progress report.
I went to a friend's 50th birthday party on Sunday and received some wonderful feedback from an old friend about the blog. She has nothing to do with shoemaking but still enjoys it which is really marvellous. I also had a fan in to Gieves and Hawkes yesterday who came by to meet myself and Justin, aka The Shoe Snob, so thank you for that, you know who you are! It means a lot to an old blogger like me, as it can be quite a lonely activity.
This week I am going to approach it slightly differently. I have decided to start with a shoe and just take you through the whole process from start to finish, commenting as I go. So here goes, wish me luck.
I have chosen a slightly unusual shoe which might throw up some challenges. It is a monogrammed velvet slipper. This requires a different construction to the traditional welted shoe and is a method which could apply more to those of you who use a cemented construction.
You start by blocking an insole as normal and letting it dry. Trim to the feather edge and cut off the lip around the feather edge. This can cause pain to the wearer if you don't do it. I use a plough, but you can use the tip of your (sharp) knife.
Cut the waist quite full and don't pull it in too much as you will not be able to stitch if you do.
At this stage take a paper template of your insole. This will come in handy when you come to prepare your sole. Because I don't do this very often, it is a difficult make for me, so I like to get all the help I can. If I dont use the template, I tend to make the sole to small and it looks bad.
Do it for both lasts as they might not be the same.
Skive your toe puffs and stiffeners in the same way as normal. You will need long stiffs in side and out because this is essentially a casual shoe (no fastenings) and needs the support in the quarters.
When you are ready, paste the skin side and put it into the space between the lining and the upper.
Then paste the other side and glue it all together.
Use side linings too, to give support along the sides of the slippers. Glue each side of the tip and place them between the lining and the stiffener. Make sure they are lined up correctly to follow the lasting allowance of the uppers.
Now, time for lasting. Place the upper on the last. Don't use chalk/talc this time because it is a satin lining and it will ruin it. Make sure you leave about 1cm above the last as you can see below. You can put a nail into the centre seam at the base of the last to keep it on place if you need to.
With your lasting pliers, pull down the front. Put one nail in the centre at the front and then four more , two on each side. At this stage, it is just to make sure the upper is positioned correctly and straight.
Adjust as necessary and when you are happy, do the other one and make sure they are a pair. Measure the positions of the monogram to make sure.
| A PAIR Of Shoes Is Key |
Once you are happy with the fronts, pull down the back to the back height mark (2 and 3/8"on the last) and put a nail into a seam,being careful not to damage a stitch.
Because this is a casual and has straight top edges, the closer usually leaves tabs on the lining to help keep the top edge straight. Put some nails in these.
Last the back part as normal, pulling and nailing as you go, a little on each side in turn. Continue till just behind the joint.
Make sure you get rid of the creases and hammer everything down at the end.
Now the forepart and the toe puff. Take out the nails at the front and relast the lining, nice and tight..
Mark the position for the puff on the lining - 2.5" - and draw a line. Paste the whole front part and under the feather edge where you will last the puff over and nail it.
Last it as normal - 2 nails on the top, 2 at each end, and then 1 in the middle, continuing 2 on each side untill you get to the end. It should look like this.
Let it dry and then take the 2 nails out of the top. Rasp it smooth and shape it to the last. Make sure the other one is the same. Remember it's a PAIR of shoes!
On the bottom side, cut away the excess with your knife and rasp it flat. This is important.
Attach the side linings using contact adhesive. Cut and rasp them into shape, like this.
You are now ready to last over the front of the upper. Follow the same procedure as before.
Normally, in a welted shoe, I would trim off excess upper before I hammer down the nails, but in this case, I leave it full because you will use this excess material to brace the upper to the insole in the absence of a welt and a holdfast/feather.
This seems like a natural place to take a break. Next instalment will be in 2 weeks after I get back from New York. I will be bracing the upper on and preparing the sole for a pump stitch construction. Contain yourselves please, you will just have to wait!
Until next week when The Other One will be taking over the blogging mantle 'for one week only', before she joins me in new York for week two of the course. Happy shoemaking!
Labels:
construction methods,
courses,
Gieves and Hawkes
Location:
Camden Town, Greater London, UK
Friday, April 29, 2011
Through the looking glass (aka the goldfish bowl)
CNBC Business Magazine - Gieves CEO Mr John Durnin sets out his vision for Gieves and we get a great name-check (see second-to-last paragraph!) although we're not too enamoured with the 'zoo exhibit' comparison...
French Truckers - thanks for stopping by guys and hope to see you in-store again soon
Permanent style - good to see the charming Mr Crompton immaculately suited on his recent tour
Mr Ducker is taking a break from blogging this weekend - so for now here's a little taster of the new Gieves.
Enjoy a great Royal Wedding day tomorrow - our warmest wishes to Wills and Kate; have a great weekend and, as it's yet ANOTHER Bank Holiday weekend here in the UK I'll be back making in the 'goldfish bowl' on Tuesday.
Labels:
Gieves and Hawkes
Subscribe to:
Posts (Atom)