Showing posts with label fittings. Show all posts

Friday, September 26, 2014

A Good Break


This week has been a busy one of fittings and adjustments for a client with enlarged big toe joints and a nerve problem in his right foot, but not his left. This means that both lasts have prominent fittings to accommodate the joints and the right shoe needs to be wider than the left at the vamp to ensure that the toes are not cramped.

Naturally the shoes still need to look like a pair, so we have used felt to pad out the left shoe, between the lining and the upper, so that they look similar. 


It has also been an exercise in fine tuning the fit, to create the room needed at the toes and at the big toe joint, without inadvertently creating bad break. Break - where leather folds and creases against itself - is a vital consideration in footwear where the vamp folds and creases as you walk.


Bad break is where there is too much leather in the vamp, creating deep creases which dig into the foot when it flexes or where the shoe is not the right length for the foot; too short and the vamp will break too far forward, too long a shoe and the vamp will break too close to the quarters and laces. Good break is tight, shallow creasing across the vamp behind the toes.

To make good break on this client's shoes, we lowered the fore part of the last diagonally from the big toe joint across to the outside feather and at the toes. We also soaked the uppers and lasted them mellow, so that they shrunk down onto the lasts. The result, tight creases and a good looking and accommodating fit.   


Obviously well fitting shoe trees are also an important part of the picture. They help to smooth out the creases in the vamp when the shoes are not being worn and prevent dirt and moisture from building up in the creases.


There is a great post on the Horween blog if you would like to find out more about leather properties and 'break'. Until next week happy shoe making!

Monday, August 18, 2014

Carreducker Intensive Shoemaking Course August 2014 Days 10, 11 and 12

And so our brave students started the final push to the summit of their shoe making mountain. With the heels built, they were ready for finishing.

Here are their finishing packs complete with rasps, sanding blocks and various grades of aluminium oxide paper.


Heavy rasping was followed by glassing and then the 3 kinds of paper until a smooth, blemish free finish was achieved on both the heels and the sole edges.


It was Blake's 21st birthday so the cake and champagne was enjoyed a day early. He even had the pleasure of some balloons!


With the sanding done, it came time to set the edges. Here are a selection of the tools of choice.


The final stage is inking and polishing, starting with the soles.


Last of all, late on Saturday afternoon, they pulled the lasts on the lasting jack and tried the shoes on. The moment of truth, as it were. Because the lasts are standard sizes, some fitted well and others required a bit of tweaking, but we managed to get a decent fit for everyone. Of course, if you give us enough time in advance, you can have a bespoke pair of lasts to work on if you decide to do the course.


What a sense of achievement for everyone. It really is something to have made a pair of shoes by hand in two weeks. All the students were very happy with their hard work and results. Well done to all of them from Deborah and myself. You guys were a lovely group. Nice work or jo da ho ho (spelling?) in Cantonese.


If you would like to try your hand at shoe making or pattern making with Carréducker, our next courses are in October 2014 and January 2015. Get in touch or look at the website

http://carreducker.com/shoemaking-courses

We will be setting exact dates for 2015 in September and will announce them here and on the website.

Until next time, happy shoe making!

Friday, March 7, 2014

Robb Report, Mayfair Times and the Independent Shoemakers' Conference part II


This week saw a great example of social media working in a good way. Now many of you might think that all things online are an alien concept in the world of hand stitching, hammers and heritage, but a life crafting can be quite solitary and so we're huge fans of distraction...(well I am)! 

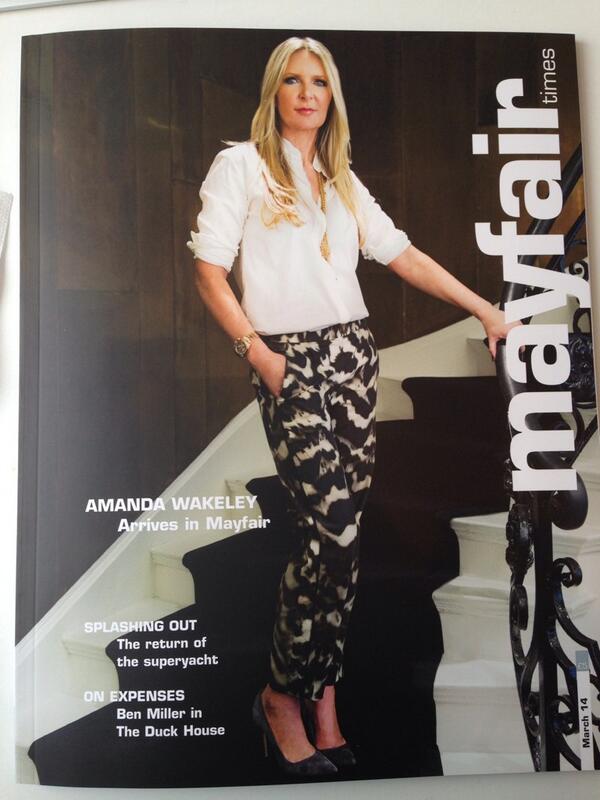
Today's lovely distraction was an interview with Mayfair's own glossy magazine, The Mayfair Times. (See the magazine's lovely new look below). Pictured above are Mr. Ducker (looking suitably sartorially superb) with the delightful Ms Lorna Davies of The Mayfair Times in the new Gieves' room at No.1. (We're very proud to be included alongside fellow Crafted alumni in a special Bespoke April issue of the magazine, but more of that next week).

Embedded image permalink

But, back to my story. Earlier this week, when I invited Facebook friends to follow our carreducker Facebook page, I was amazed to hear from an old school friend now living in New Zealand.  She Facebooked to say that she had just been reading about us in the Robb Report! How? Well, the Editor-in-Chief of the Robb report had been in her office, had been talking about us and then left her a copy of the magazine! So sometimes social media can help to make the world feel a little cosier and friendlier! Can't wait to see the article and thank you Ali!


Home

But off the Cloud and back to planet earth for Part II of our coverage from the Independent Shoemakers' Conference. Another stand-out demonstration was by David Xavier who reminded us of how we used to make a mean forme from the last with kraft paper...and just how easy it is (well David made it look easy, but he has been doing it for a long time).


Holding the paper perfectly still against the last with one hand, David then quickly folded the paper to mark the centre back and centre front. with a pencil he then marked the vamp point and back heel height and using his trained eye, drew in the top line and style lines.


Once he had the mean forme, David was able to use a trace wheel to transfer the styles lines and edges to create the necessary pattern pieces.


He also showed us how to make a standard and pattern pieces for a court shoe or pump...a style of shoe that has had me scratching my head in the past when I've been trying to work out why my pattern wasn't working. Anyway, his approach soon settled my doubts and I now feel confident enough to give my pattern making efforts another go.


The day closed with a fascinating talk by orthopedic shoemaker Martin Kistner, about the many different types of measuring equipment available for fee from foam impression boxes and carbon imprints to electronic footprints and 3-D scanners. Despite having tried many of these new tools, Martin still prefers to rely on the combination of his experience, a pencil and paper and a carbon imprint of the foot. I agree. Far better to grow your experience and to use the tools that work for you, than to keep trying new techniques and master none.   


Martin's approach is 'Foot whispering'. He obviously has a keen understanding the structure of the foot and believes that many foot problems stem from an imbalance in the peroneal and medial muscles on either side of the foot. He feels the customer's feet and observes their posture and perambulation and then creates orthotics accordingly.  


Sadly I don't have a picture, but the highlight for me was the photo Martin showed of his workshop...bliss! Organised, clean and with purpose-made furniture on wheels...I can but dream.

Until next week, with London bathed in sunshine, we wish you happy shoemaking!


Friday, November 1, 2013

The Art of Fitting and Selling Shoes


 The last few styles of Gieves & Hawkes' fabulous (if we say so ourselves), new, ready to wear shoe collection came in this week. 

So, we have been busy giving the shop floor team a refresher in fitting and selling shoes. I'm not sure retailers usually bother with this - kids' shoe shops seem to be the only ones where any kind of fitting is done - but to sell men's shoes well, you need to know what you are talking about especially when it comes to fit. 


This advertising slogan from the 1930s says it all.

This slogan is taken from a volume of F.Y.Golding's books "Boots & Shoes their Making, Manufacture and Selling". Comparing our fitting notes with theirs, not much has changed in 100 years. The x-rays of feet in shoes below are a great illustration of what to and what NOT to look for!

1. Room for the toes - shoes will not stretch lengthwise so if the toes touch, the shoes are too small!

Above top: the shoe is too cramped for the toes
Above bottom: the shoe fits well with adequate space for the toes

 2. The heel and big toe joint need to be correctly positioned so that the shoe and foot flex together and the toes stay relaxed 


Here the heel to joint fit is incorrect
 - the shoe is too big for the foot
- the heel and big toe joint are too far forward
- the toes are scrunched up to hold the shoe on.


Here the heel to ball fit is good:
- the heel sits back into the shoe
- the ball of the foot is correctly positioned
- the toes are relaxed.
 3. A comfortable fit between the heel and the top of the foot (the instep) is needed that does not put pressure on the instep and holds the heel in place without slipping


Here, the salesman allows the customer to slip his foot into the shoe;
the angle of the foot rest encourages the foot to naturally sit back into the heel of the shoe. 

In Gieves' ready-to-wear shoes, the last has a deep, slightly elongated toe box to offer more toe space for different foot shapes and cushioned socks for an immediate feeling of comfort and support. (The cushioning takes up space in the shoe so a little extra room has been added to the lasts to allow for it).


Shoe fitting tips:

- Know your shoe styles
- Know feet and get used to handling them (!)
- Never discuss size (we know what a sensitive subject it can be!!!)
- Initially try a bigger size, so the first experience is of space not pain
- Ask the customer to remove both of their shoes before trying on the new pair. Having one old shoe and one new shoe on is an unfair comparison. An old pair of shoes naturally feels more comfortable than new shoes.
- Let the customer slip their foot into the shoe, do not put the shoe on the foot - encourage them to use a shoehorn to put the shoes on (fingers will stretch the shoes at the back)
- Allow the customer to make the choice as far as possible, with guidance
- Do not sell a pair of shoes that do not fit - it is a false economy
- Offer an alternative style of shoe, if the first style choice does not work for the customer's feet. 

A high instep will benefit from a Derby or Monk strap shoe rather than an Oxford, as will a foot that swells during the day; a wide foot will work better in a Derby, Loafer or suede shoe; a narrow foot and heel will work better in an Oxford; a wide foot will benefit from a suede shoe or one without a wing cap or seams across the vamp


It is often hard for the customer to articulate what feels wrong or right. These pictures show a lady and a salesman using a Pedoscope. This contraption allowed the customer to see how their feet looked in a pair of shoes and took x-rays of them, like the ones shown. What a brilliant idea! But where have all of the Pedoscopes gone? Has anyone seen one or better yet tried a Pedoscope? 

Until we get our hands on one, the team at Gieves will just have to rely on good, old-fashioned know-how!  

Until next week, happy shoemaking!

Friday, June 21, 2013

Boot Lasts Vs Shoe Lasts With Fittings

Once more we welcome you all to our humble little blog. I personally have had a very short week having had a long weekend in Barcelona where, amongst other peasures, I had a beer with Norman Vilalta, fellow bespoke shoemaker. It's always a pleasure to see other makers and see how they work. He has a very nice shop in a swanky part of town and I like his passion for innovating, experimenting and pushing the trade forward.

Yesterday saw an Australian shoemaker come to us to do a master class of four days. She wants to learn hand welting techniques, so, starting with a blocked insole, a pair of uppers and a pair of lasts she is preparing the insole; skiving the stiffeners; hand lasting; hand welting; and hopefully the soles.

Our master classes are aimed at shoemakers with some experience and are completely tailored to the student's needs. We enjoy them and we hope that the students do too.

It's nice to have a 1 to 1 class with someone and makes a nice change from the intensity of the group classes.


We have been asked every now and then about the differences between shoe and boot lasts. We sometimes make bespoke lasts for students to use in class and they ask this question on occasion.

It is possible to have a specific boot last which has its own specifications, a higher instep and ankle area like the one below.


It helps when making boots, but is not much good for making shoes because the profile along the quarters is different. It is especially unsuitable for slip on shoes.


So what we suggest is that they have a shoe last and that if they want to make a pair of boots, they put some fittings on the shoe last. The most important place is on the throat of the boot above the instep. This is particularly essential because when you are putting on boots (specially those with no fastenings, laces, buckles etc) you need to be able to get your foot into the bed of the boot, but they must be snug enough to hold the foot. This is why this fitting is so important.


The best way to do it is to soak a thin piece of insole shoulder or heel lift and cut it like the image above. You also need to skive it flat where it meets the instep of the last.


Use small tacks to attach it to the last and shape it . Then let it dry and it goes surprisingly hard and rigid creating the necessary shape for the boots.


Depending on the lasts, make sure the fitting doesn't cover the split where the two parts of the last meet. Or if it is a sprung last, doesn't stop the last from breaking. Otherwise you won't be able to get the lasts out when the boots are finished.


So here are the two alternatives side by side, a boot last on the left and a shoe last with a fitting on the right.

The one thing you get with a boot last is the shaping round the ankle. A shoe last doesn't have this, but you can make a similar fitting as the throat on the heel, but we have never found this to be necessary with our customers. As long as you measure the ankles well and the upper pattern is good, you should be fine with just the fittng at the front.


The other thing about fittings is that you can adjust their size according to the type of boot you are making. The ones we made on these lasts were a low bootee, so the fittings are low.


And that is it for this week. We hope you found it interesting and look forward to hearing any comments you may have. Our knowledge is by no means exhaustive and we welcome any additions from our readers around the world.

Until next week, happy shoemaking.