Thursday, January 12, 2012

Week 1 Day 4

 
A bench of shoemakers tools - essential for handsewn work but somewhat bemusing if you've never worked with them before. As I revealed in yesterday's blog the lasting pliers are becoming more familiar to our class and so today's lasting action looked less challenging and hopefully more rewarding as insoles, toe puffs, stiffeners and uppers were transformed into a shoe.

 The toe puffs proved particularly tricky and revealed just how important a millimetre's difference in the thickness of the leather. When skiving, what seems a tiny difference when the puffs were flat, when lasted suddenly became a clumpy toe, bump or ungracious curve. Hammering, gentle rasping and some smoothing put paid to any unevenness.
 The lining was lasted first, then the tricky toe puff and finally the upper, checking all of the time whether the toes match.


And meanwhile, whilst The Cafe space where we are working is a hive of industry our own Cockpit workshop looks sadly empty! Mr Ducker takes the reins tomorrow and then I will be back in the driving seat on Saturday before sending the students off with some weekened homework!

Wednesday, January 11, 2012

Week 1 day 3

Another day and students, you did great today!

Yes Raymond that means you too! And Godwin for getting that waist down! Great persistence! And talk about going off from a standing start when it came to lasting pliers - never touched a pair before - well let me tell you you mastered them and painful, exhausting and frustrating though it may be, tomorrow will see you being welcomed by at least one and in many cases a pair of lasted shoes. Toe puffs still to go but I hope that all of the students will be welting by the end of the day.

Lasting is always a challenge. You are essentially using your whole body - legs, chest and knees to keep everything stable whilst your hands use an unfamiliar tool, to stretch leather that doesnt want to be stretched and then to nail said leather in place. Without it slipping, ripping or moving! Easy eh? Even I came home tonight after today's trials and tribulations and dove into a hot bath with a large glass of wine! So how the students must be feeling after a day of unfamiliar physical activity and mental persuasion, cajoling and downright bullying I don't know! But I can guess.


Tuesday, January 10, 2012

Week 1 Day 2 London course Jan 2012

The lampshades in our workspace are suitably shoe-related!
Work is progressing apace in the studio as our dedicated students learn more and more about the intricacies of good knife work and keeping their 'steel' sharp. There were sighs of frustration as once-sharp knives were blunted and smiles of delight as sharp knives cut through the leather 'like butter'. Today's top sharpening award goes to Patrick, who for at least some of the day, had a knife that could have carved through steel!

I was reminded as always, about how easy we make it look, but after 15 years if we didn't, I would be worried. Like everyone else we have seriously off days too and I took the precaution of wearing plasters today, simply because my hands are still soft from Christmas and will be cut to ribbons without some protection. On that note, day 2 saw the curse of the 'has anyone cut themselves yet' question come into force with two cuts in quick succession. But at least the ice has been broken and it was nothing serious.

Tomorrow will see the group finishing their holdfasts, lasting their shoes and I hope welting...otherwise it will be homework for tired hands on Thursday night! But they are doing well and keep their spirits up and blood sugar levels high during the day so I am looking forward to another good day's making tomorrow.


Preparing the holdfast 1

Preparing the holdfast 2
Preparing the holdfast 3


Monday, January 9, 2012

January 2012 - day 1 week 1 shoemaking course

We don't like to ease ourselves into the New Year, oh no! It's the second week of January and our first shoemaking course of the year got under way today with a great group of students from Taiwan, Canada, the US and good old Blighty!

James and I have spent the Christmas period revising, editing and refining the course notes to be much more user friendly (we hope) and our new students are going to be the guinea pigs - telling us what we have omitted, where we need to be more clear or to give us a pat on the back as and when we deserve it! It has been quite some undertaking, but we hope will bring us a step closer to finalising the content of the DVD we keep talking about. And yes, alumni students we will be sending the new notes out to you too!

Also new is our venue. We have used an art room in the past and our own studio for smaller courses, but the freeing up of a new space on our floor at Cockpit has meant we have been able to continue business as usual. The space is a long narrow room equipped with a sink and relatively good lighting. Adding a spotlight for each student and some ambient lighting makes for an attractive and pleasant work space.


So, how did our new group get on today? Well many, many hours were spent sharpening our favourite and most trusty tool, the shoemaking knife. Through trial and error the students learned where and how much pressure to apply to the knife and once it was workable, the benefit of using the leather side of the strop intermittently to keep the knife edge keen. Insoles were soaked and blocked ready for preparing tomorrow and quite a few stiffeners have been skived, so they are well on their way.


A good start and let's hope that they/we can keep up the pace!
More from me tomorrow as we make the feather/holdfast, skive the toe puffs and, all being well begin lasting.

Friday, January 6, 2012

Abracadabra! Shoemaking magic!

A piece of magic that we shoemakers can conjure up, is a few more inches in height for our customers, without anyone knowing about it. Something we've nicknamed the 'Sarkozy effect'! We can incorporate up to an inch as a lift inside the shoe and a further ¼” to ½” inch on the heel – and even more if the customer likes to wear a higher, Cuban style heel


To create the lift, we first use rubber solution to attach a thin piece of lining leather to the underside of both lasts, skin side down. (It is important that it is rubber solution so that you can disconnect it before making the shoes!).Then we use contact adhesive to attach several layers of thin 1-2mm cork to the flesh side of the lining leather - the amount of cork needed depends on the height of the lift at the heel. For this particular customer we are creating ¼” lift inside his shoes.


Once the layers have been stuck to the lining it can be trimmed to follow the contours of the last (use four nails down the centre of the cork to hold it in place, as you would the insole leather). The important thing is to blend the layers to make one smooth edge that will not show through the upper when it is pulled over.


At the inside waist you need to bevel it off (as you do the edge of the insole) to create a smooth transition from last to cork. This ensures that you do not end up with an unsightly ridge at this point.


Finally, you can also use the plough to trim the lip of the lining off at the feather edge where it meets the last (as you would the insole). But be careful not to plough away too much material.
Once everything is even, remove the nails. Sit the lifts onto your mellow insole leather, draw around them and cut out the insole leather leaving it ¼” full from the edge of the lift. Prepare the insole as usual and nail it in place to the lift/last with four nails down the centre. Now begin to nail it around the edge of the lift as usual. Be careful not to put your nails too close to the cork edge so that you damage it and space them about ½” apart. Once you have nailed all of the way around, knock the nails over and allow the insole to dry. (This may take a little longer than usual because of the cork).
Once dry, trim the edge of the insole to blend with the lift and use the plough to shave off any ‘lip’ created between the insole and cork. Remove the nails from the middle, remove the insole and unstick the lift from the underside of the sole. Talc the skin surface of the lift and nail both it and the insole together back in place.


Now you can prepare the feather, last and make the shoes as usual.
When it comes to hiding a lift, this is where our approach to designing really comes to the fore. By drawing the chosen shoe design onto a customer’s last we can ensure that the proportions disguise the lift and can also accommodate any orthotics comfortably. So everything inside the shoe remains our little secret and no one need ever know! ;)

Saturday, December 31, 2011

Getting The Fit

As bespoke shoemakers, we spend much of our time finessing a customer’s lasts to ensure a good fit. The lasts do not replicate the foot exactly, but instead are an approximation of its shape and volume to accommodate this flexible limb that keeps us upright and active.
We take a series of drawings and measurements to create the lasts - the distance around the instep and the heel (this holds the foot in a shoe or boot); the measurement around the instep and arch; the width of the joint at its widest point; and the space around the toes themselves.
We also take foam impressions of the feet so that we can understand where the weight is distributed and where arch support is needed. All of this information helps to inform us as designers and shoemakers.
But what of the high street? With the big January sales well under way, how do you avoid being swept up in the moment and buying shoes that don’t fit? What should you look for? How do you know if the shoe fits?
There are so many things to consider when buying shoes, but these are our top tips to help you to get a good fit.
  • Never buy a pair of shoes ‘in your size’ without trying them on. Standard sizes vary from brand to brand so you do need to try them.
  • Some styles will suit your feet better than others. For instance if your feet swell during the day, a Derby will be more comfortable than an Oxford. This is because the front laced section of a Derby can be opened up/loosened more than an Oxford which is closed at the front. This also applies when you fly or in warm weather.
  • Brands from northern Europe tend to have a wider joint as standard and southern European/Mediterranean brands tend to have a narrower, slimmer fit at the joint.
  • Remember that one foot is usually bigger than the other so always try on both shoes.
The check list when you try on a pair of shoes:
o Is there enough space for your toes when you are standing upright and walking?
o Does the back of the shoe feel comfortable and cup your heel?
o Does the heel slip at all when you walk?
o Is there enough room on your instep (the top part of your foot)?
o Is there enough room for your foot across the widest part of the shoe, at the joint?
o Do your toes clench up when you walk? (This suggests your foot may be slipping in the shoe).
o Does the shoe support the arch of your foot?
And ultimately the main question is “Does it hurt”? I can assure you, after years of wearing ill-fitting shoes and super high heels that if it hurts when you try the shoes on, it will still hurt many, many months later!
So gentlemen beware! Please don’t use your feet to stretch a shoe to fit, enjoy the sales but choose carefully. (Words of advice from one who has been there, seen it, done it and is now paying the price with painful sesamoids not what you think – actually two small bones under the big toe joint).
We always prefer our bespoke customers to come to us through desire rather than necessity ;).
Until midnight tonight, when we wish everyone a very happy New Year and 2012!

Friday, December 23, 2011

Christmas deliveries

Even though our clients don't often make special requests for shoes to be delivered by a certain date i.e. patent shoes for a party or the red carpet we do like to deliver to them ahead of the promised date if at all possible. (And of course there are a certain pair of magical boots that need to be ready well in advance of 25 December - but we don't name names!)

One client's shoes have been following him around the globe in an effort to deliver them in time for an event, but sadly to no avail so far. They have been to Tokyo and back to London so far. He has been to Tokyo, New York and Washington state but it is physically impossible to get them to him there by Boxing Day. So instead, we have persuaded him to wait until he is in London to collect them - we couldn't bear for them to disappear in transit!

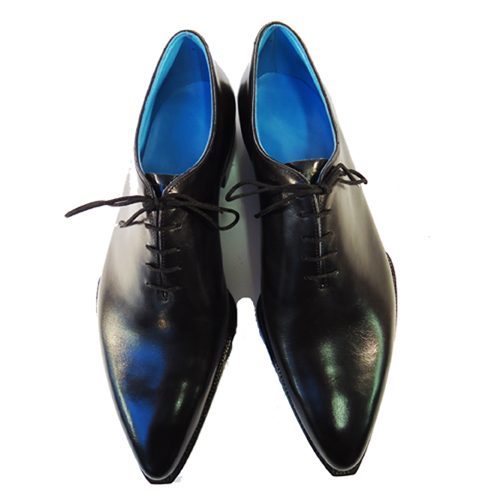
In contrast, we were thrilled to deliver this pair to a very fashionable client this week - just in time for the seasonal festivities! They are a slightly streamlined version of an earlier design, but with a sloped toe box.
Our particular favourite detail was the client's choice of lining - a beautiful pale blue - contrasting nicely with the jet black and jutting, spade welt.


Another client project taking us through to the New Year, and a personal favourite, is this pair of hunting boots.

Already braced but with the design still being finessed, they are designed for maximum durability out on the moors and heathland.

They will also have a pair of gaiters to go over the top, but not until the client has signed off the design and fit of the boots themselves.

So that's it from us this Christmas. We wish you all a very Merry Christmas and fantastic holidays...
Warmest wishes until next week

Deborah & James