Thursday, May 24, 2012

Boot camp by any other name!


Well another course is over and James and I are settling back into a routine of shoemaking, creative projects and enjoying some rare summer sunshine! (Although not for long, as James is back out to Chicago and New York on our quarterly trunk show trips in a fortnight...followed by a well earned holiday in Maine)!

We get great feedback after the courses, which is really important to make sure we keep improving and keep the course relevant. Our friend and fellow shoemaker in New York, Jesse is also a great help, because she not only attended one of our courses early on but has watched us in action in her studio every year. Even she says we are improving our methods and approach!

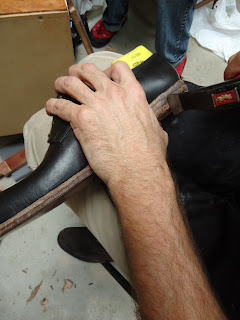
But there is something of the course that we still find hard to convey and that is just how physically exhausting it is! We use the word intensive to describe it, not just because of the short time frame, but because it is physically intensive and you are working most of the time, seated in a low chair with your knees at 90 degrees.

So here’s the boot camp guide to shoemaking to show the tools and parts of the body used at each stage; and I’ve given each job a mark of intensity with 1 being low intensity and 5 high intensity:

Sharpening your knife– knife & strop working on a table - good hand eye co-ordination – engages hands, biceps/ triceps, upper body and core. (2)

Skiving – knife, glass board, strop working in your lap - good hand eye co-ordination, engages hands, biceps/triceps, upper body and core. (3)

Preparing insole– nippers, nail hammer, last, knife – engages hands, biceps/triceps, upper body and core. (2)

Lasting – lasting pliers, last/upper – engages hands, biceps/triceps, upper body, core, thigh and butt muscles. (5+)

Making threads – threads, leather, wax, tar, bristles - good hand eye co-ordination; engages upper body - one of the few things that you can do standing up! (1)

Welting – threads, awl, nippers - engages hands, biceps/triceps, upper body, core, thigh and butt muscles. (5+)

Preparing soles – knife, hammer - upper body, arms and hands – engages upper body and core. (2)

Stitching soles – threads, awl - upper body, arms and hands – engages hands, biceps/triceps, upper body and core, thigh and butt muscles. (2)

Building heels – hammer, knife – good hand eye co-ordination; engages hands, biceps/triceps, upper body, core, thigh and butt muscles. (4)

Finishing – rasp, broken glass, sandpaper, paintbrush, irons - engages upper body and core (4)for rasping, glassing (2) for painting and irons.

(I threw in a 1, but to be fair none of it is actually low intensity because you are using muscles groups you never even knew existed!)

So there you have it…the equivalent of 10 days in the gym! 

Saturday, May 19, 2012

New York Shoemaking Course 2012 Final Day

And so it ends. 12 days, 7 students and a lot of hard work. Well done to all of you from Deborah and myself. It really was a great effort and I'm sure all the readers will agree that the finished shoes are of an excellent standard.

This is a strenuous, physical course, but very rewarding.

I have had an excellent week, one , because I really enjoy sharing this wonderful craft of ours, and two, because this group was a great bunch of people.

We wish you a future in the trade in whatever form it takes. Welcome to the fold!


So, final day highlights? Finishing. But the last stages were inking and applying wax. We also spent a long while polishing.


Applying wax.


The finished shoes. Plus my tan brogues.


Natty pink socks and laces combo. What d'ya think, Rob?


Look at that shine.


And finally, the happy students with the king (read dictator) on the throne.


And that, as they say, is a wrap. So long, farewell, until the next time, happy shoemaking.

Friday, May 18, 2012

New York Shoemaking Course Day 11

Day 11 saw us progressing very well. Everyone is well on target and we will not have the usual mad dash to get everything done tomorrow. Good work one and all.

Here the heel edge is being sanded.


After being previously glassed.


The edges are sanded after the glassing process.


Before the edges are set, the lip on the top of the welt is ploughed off.


Then the edges are set using a hot edge iron.


Soles and heel top pieces were glassed and sanded ready for inking.


And so, after 2 intense weeks of hardcore shoemaking, we are left with one final day. It's been a journey and I hope the students are happy. Exhausted,but happy.

Until tomorrow, happy shoemaking.

Thursday, May 17, 2012

New York Shoemaking Course 2012 Day 10

Day 10 and it was a frenzy of rasping. Rasp, rasp, rasp until all those blemishes were erased.

We started the day by marking and trimming the seat. After narrowing it to an even width, most of the students then had to reshape the heel with the knife.

The trick with this stage is to use an old credit card to protect the upper.


The final bit of the heel was the top piece. They glued it on with contact adhesive and then secured it with nails.


Once the heel was fully shaped by the knife, the rasping started. They rasped the heel, heel breast and the sole edges. A lot of rasping.


After rasping came glassing with 2mm glass broken in a curve which creates a sharp cutting edge. This is used to get rid of the rasp marks.


Only 2 days left and tomorrow will see us glassing, sanding and setting the edges. Can't wait.

Until then, happy shoemaking.

New York Shoemaking Course 2012 Day 9

Day 9 and it is a frenzy of heel building. But before we get to that, I wanted to say a little about the room where we do the course. It is a perfect one for shoemaking, large, airy and with plenty of natural light from 4 huge skylights. And the air con is a boon! And because it is a shoemaking studio, it has the odd gadget that makes life easier for us.


And so to heels, we spent the whole day building them. Heel building is a challenge and hugely important because you can injure someone's feet with poorly built heels. So, with lots of concentration and effort, we progressed. We build heels with nails and glue rather than wooden pegs.

 Here is a student trimming the second lift with a SHARP knife.


Once the lifts are on, we use the French shape hammer to peen the edges. This squashes the leather together and closes any gaps between the lifts, making the heel look like a solid entity.


Another important aspect is making the heels a pair. So before the top piece goes on, you have to make the comparisons and adjust accordingly.


Day 10 will see us finishing the heels and getting on to finishing - joy!

Until the next time, happy shoemaking

Tuesday, May 15, 2012

New York Shoemaking Course 2012 Day 8

So, it's day 8 and things are hotting up.The final push to the summit starts tomorrow, but today we were making preparations.

Everybody finished stitching the soles and we started making the split lifts (rands to some of you). This is the first part of the heel, a semi circle of lifting leather.

In this picture, after finishing the stitching, they flattened the stitches with the sleeking bone; smooted down the channel flap; hammered the edge of the sole to compress it and finally glue it in place with contact cement.


Here the split lift is being skived, prior to hammering it into a horseshoe shape.


Here it is being nailed on with 20mm nails and paste.


Once the rand is on, they trimmed the excess and peened the edges with the French shape hammer. This compresses the edge into one solid entity.


Heels tomorrow, can't wait. Until then, happy shoemaking.

Monday, May 14, 2012

New York Shoemaking Course 2012 Day 7

Day 7, begins with a new week and a new teacher. Having flown in yesterday, it was great to meet the students. And what a lovely group they are! Deborah said it had been a pleasure to teach them and I can understand why.

Today saw everyone trimming their soles with their very sharp knives! Followed by cutting a channel which seems to be everyone's favourite stage. Needless to say, they all did admirably with a little help from me).


Next came stitching the soles which is a much easier task than sewing the welt, so everyone was happily surprised.


Apart from a bit of bristle slippage, it went by smoothly.


One word of warning though. Don't put your awl into the welt too near the edge, because this is what can happen. While pulling the threads through, the whole sole gave way - quite a breakthrough! I have to say, I had never seen this, so it's true, you learn something new every day.


All in a good day, so well done everyone. We will finish stitching the soles tomorrow and start building heels.

Saturday, May 12, 2012

Day 6 NY Shoemaking course - handover day

It's my last day today and I feel kind of sad. It's been such a fun, lively week I've really enjoyed it and hope everyone has too. The students are exhausted though and it's hardly surprising as we looked back on all that they've achieved today. They've worked with knives, lasting pliers, nippers, two types of hammer, rasps, broken glass, awls and of course the killer toothbrush. All tools that can make or break a shoe (or a finger!) if used incorrectly.


 So I'm really proud of all of the work that they have put in and the progress that they have made. Despite flagging energy levels, injuries (old and new) and a stinking cold they made it through with soles stuck on and nearly all of them preparing sole edges and peening heels. A mammoth task!

Credit must go to Wright who, I think he would admit himself has found some of the processes a challenge, but is powering on with determination and enthusiasm. Bravo! So he will hopefully be caught up and James will enjoy a lovely sociable week stitching soles, building heels and finishing. I'm looking forward to seeing next Saturday's group shot with shoes on and feet in the air!


 So, good luck everyone and thank you for such a great first week!
The class of NY 2012, still able to muster a smile (and a show of tar-covered, bruised and battered 'jazz hands') at the end of a very long week from left to right: 
Wright, Jess, Michael, Allison, (yours truly) Lynn and Marci.

Friday, May 11, 2012

Day 5 New York Shoemaking Course

It's been another great day on the course (hope you agree guys) and we are only hours away from the first channels being cut and the soles going on. I am looking forward to a good day of sole stitching tomorrow so that next week there will be plenty of time for questions and answers with Mr Ducker as sole stitching is finished and heels are built. 


 Hopefully there will also be plenty of time for finishing - getting a really good edge on the soles and heels. I'm expecting to see great results in the final group photo next Saturday! Tomorrow, a last post from me before Mr Ducker takes the reins on Monday, so happy shoemaking until then.

Day 4 NY shoemaking course

The day started with a lovely line up of shoes - and we can call them that now - all lasted, stiffeners and toe puffs in and ready to welt.


 Then with threads made the welting was under way. We've had a day of bristle slippage for some of the students which meant much careful unwinding, re-keying and tarring of the bristle and re-winding. Frustrating, but VERY good practise. James will be teaching them all another way to attach bristles next week which might work better for them.

And the day ended with one shoe welted and 5 others almost done...so everyone has gone home with some welting homework! We shall see how they fared in the morning!