Well, here goes, I can officially reveal the location of our second workshop. We are extremely proud to announce that we have opened a concession at Gieves and Hawkes, Number 1 Savile Row, London. That has a good ring to it, doesn't it?
We have set up a fully functioning workshop there, and we will split our time between the there and Bloomsbury. We will see clients and make shoes in both places. Our space is on the ground floor in the shoe section and we are just about visible from the Vigo St entrance. Swing by and say hello if you are in the vicinity.
We are behind a glass partition so that customers in the shop can see us working. We provide a fantastic piece of theatre, and, more importantly, customers can see what we do. This really helps to demystify bespoke and explain what it is that people are buying into when they commission work. I think when people see what we actually do, the whole bespoke shoe process sells itself.
We have had a great response and have taken orders already and it is only our second week there.
We have always thought that bespoke tailoring and bespoke shoes go hand in hand as complementary crafts, and, as far as we know, this is the first time the two services have been available in the same place in London. So Gieves and Hawkes and carréducker, working side by side, now offer a head to toe service for its clients. It is very exciting and a great opportunity for us. Good times!
As you can imagine, life in the last few weeks has been a bit hectic, so making shoes has been slightly sidelined by the move, but, as of next week, normal service will be resumed.
We met Justin Fitzpatrick aka the Shoe Snob this week which was great. We chewed the fat (or is that the sole?) and put the world of shoes to rights. I really like his blog, you should check it out if you don't already know it. Lively opinions and I really like the Shoe of the Week slot.
This week, we also met Stephen Pulvirent of Men's Flair and Simply Refined. Again, we had a very good chat about the world of bespoke and men's style. A real pleasure.
So people, that, as they say, is that. Until next week, happy shoemaking!
Friday, November 26, 2010
Friday, November 19, 2010
Ink And Wax 2
If you were an ambitious bespoke shoe making company in London and you wanted to give yourself the best opportunity for success, where would you choose to have your workshop? Answers on a postcard please (go on have a guess).
Well, it just so happens that carréducker has opened a second workshop in London and it is in an absolutely fantastic location. It is all a bit hush hush at the moment, but, as they say, all will be revealed. As you can imagine, we are very excited! More of this soon ( I am busting to tell you!).
So, back to more important things, like your heel and sole edges. I was a bit of a chump last week. Someone had taken the memory card out of the camera last week and not put it back, so I do still have the pics to finish the essay. How was I supposed to know?
Right, you have applied the wax to the inked edges and melted it in with a hot iron, but it looks all blotchey and uneven. Here is what you do.
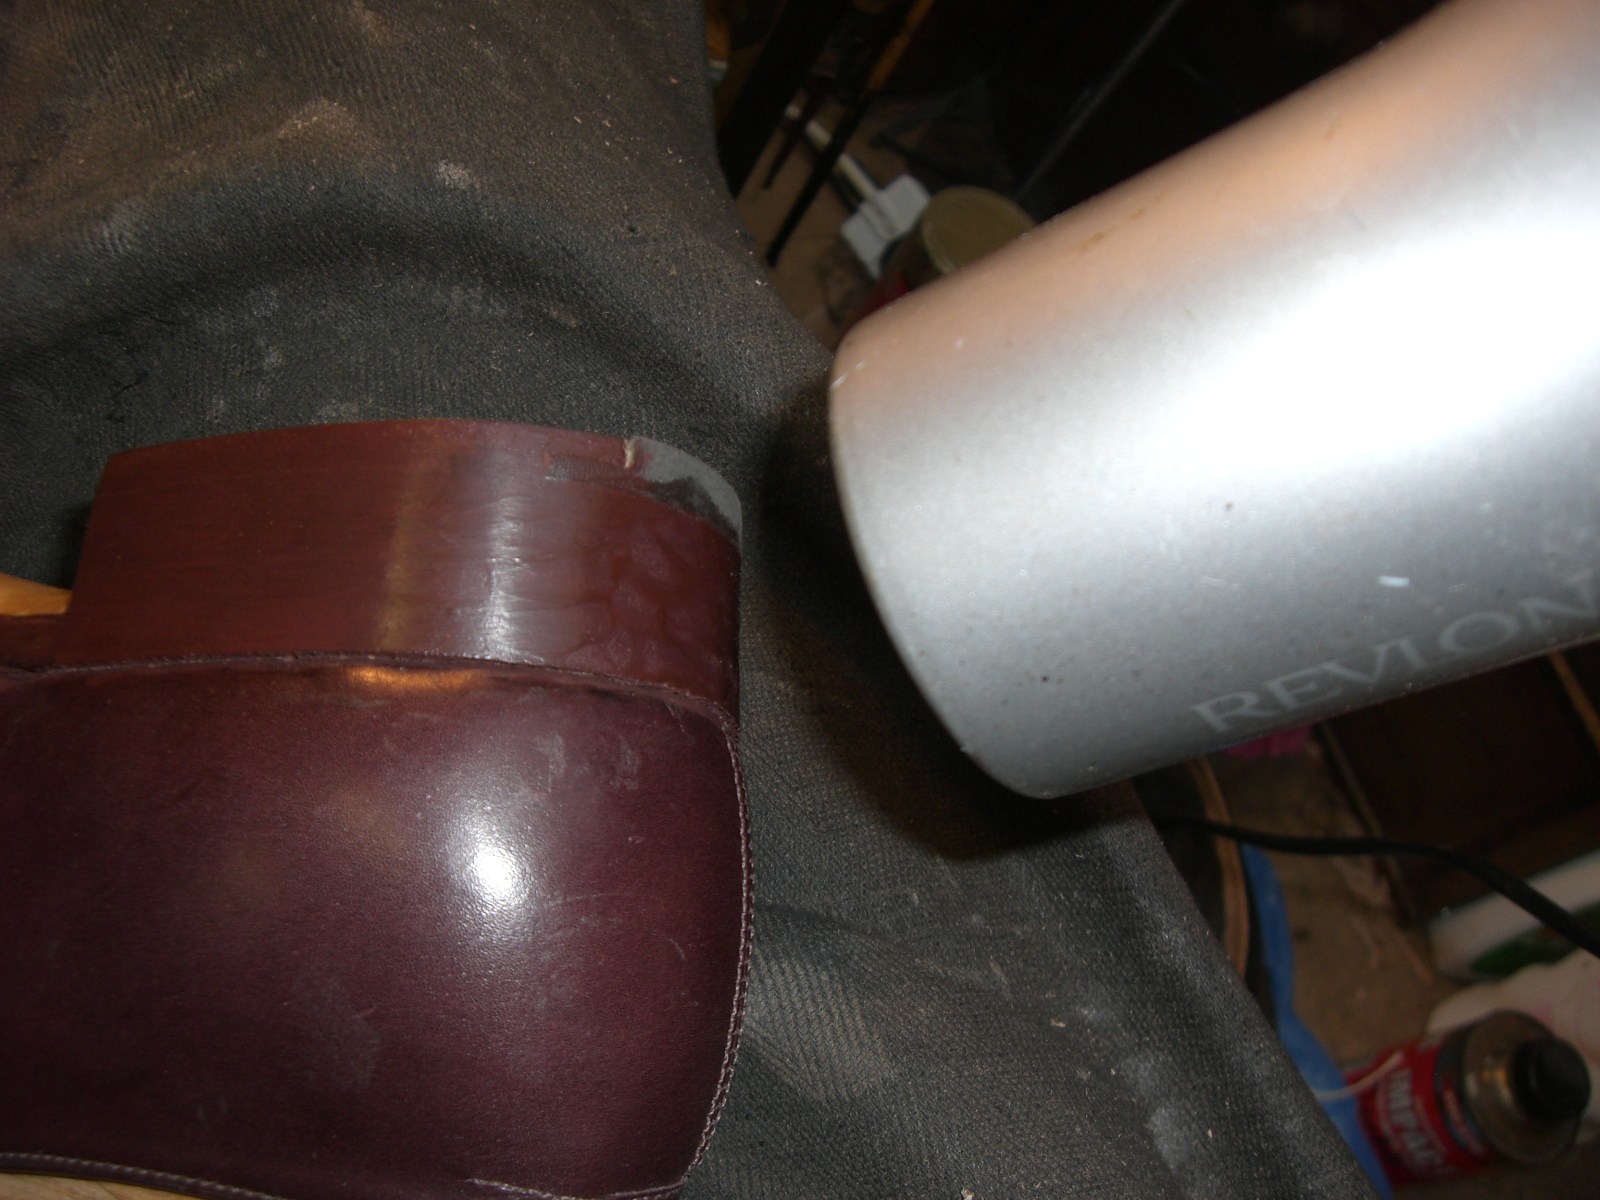
When I first learned, I was taught to use a face flannel, put it over my thumb tightly and just rub the hell out of it until it melted and went smooth. This method still applies and it is a perfectly good way to do it, but it makes you sweat, especially in the summer. So I broke the rules and introduced the only machine (the shame of it!) into my workshop. A hair dryer!

So with your trusty flannel in hand heat the heel edge with the hair dryer, until the wax starts to melt. Then rub the hell out of it as before. But this time, you need much less energy. A final light rub brings out the shine.

The sole edge is a bit different. Don't use the hair dryer as you may damage the upper. Just rub with the flannel until the wax melts. Make sure you rub the top of the welt too. And do a final light rub to bring out the shine.

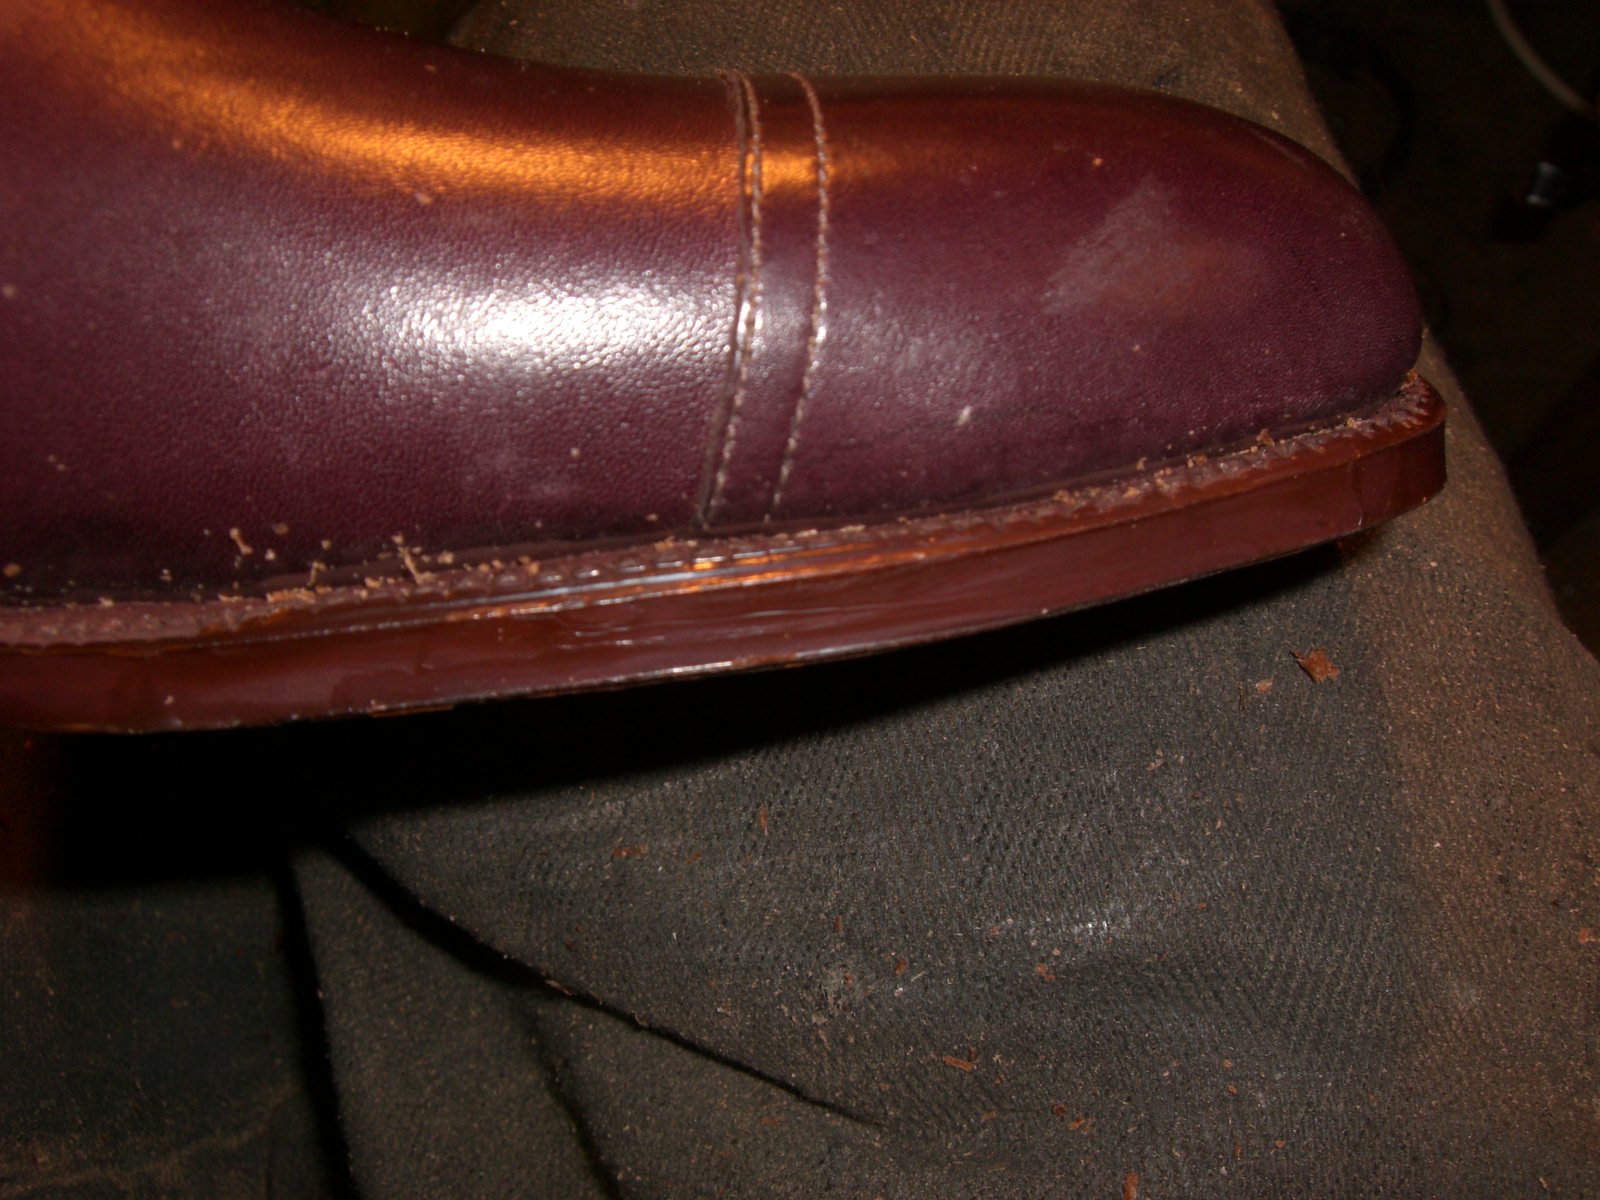
Lovely shiny edges.

Notice the little line of wax on the sole. Try to make this even as it looks really great.

Nearly done. You now need to use the seat wheel around the seat. This is just cosmetic, but it also covers any poorly finished seat areas. The seat wheel is an iron that you need to heat on your burner, but not too hot. It has a lip which you rest on the seat and you must press both downwards and into the heel and it leaves a line of little marks which looks very decorative I think you will agree. You will have to pass the flannel over it to get rid of any marks left by the wheel.


The last thing is to use a single lipped iron on the heel edges. This is a regular edge iron that I have ground down on a grinding machine. But you can sometimes find original ones.
Place it on the burner until it is very hot. You then run it round the top edge and front edges of the heel. It leaves a line and gives a finishing touch. If the line is not very defined, repeat the process, but put a bit of melted wax on the edge first and work it along the edges. Et voila! Gorgeously finished bespoke shoes.


If you like, you can use the edge of your fudge wheel to make lines too. It looks pretty cool. The sky is the limit and use your imagination.

That is it. Have a good week and happy shoemaking.
PS, very much looking forward to meeting the Shoe Snob on Monday.
Well, it just so happens that carréducker has opened a second workshop in London and it is in an absolutely fantastic location. It is all a bit hush hush at the moment, but, as they say, all will be revealed. As you can imagine, we are very excited! More of this soon ( I am busting to tell you!).
So, back to more important things, like your heel and sole edges. I was a bit of a chump last week. Someone had taken the memory card out of the camera last week and not put it back, so I do still have the pics to finish the essay. How was I supposed to know?
Right, you have applied the wax to the inked edges and melted it in with a hot iron, but it looks all blotchey and uneven. Here is what you do.
When I first learned, I was taught to use a face flannel, put it over my thumb tightly and just rub the hell out of it until it melted and went smooth. This method still applies and it is a perfectly good way to do it, but it makes you sweat, especially in the summer. So I broke the rules and introduced the only machine (the shame of it!) into my workshop. A hair dryer!
So with your trusty flannel in hand heat the heel edge with the hair dryer, until the wax starts to melt. Then rub the hell out of it as before. But this time, you need much less energy. A final light rub brings out the shine.
The sole edge is a bit different. Don't use the hair dryer as you may damage the upper. Just rub with the flannel until the wax melts. Make sure you rub the top of the welt too. And do a final light rub to bring out the shine.

Lovely shiny edges.

Notice the little line of wax on the sole. Try to make this even as it looks really great.

Nearly done. You now need to use the seat wheel around the seat. This is just cosmetic, but it also covers any poorly finished seat areas. The seat wheel is an iron that you need to heat on your burner, but not too hot. It has a lip which you rest on the seat and you must press both downwards and into the heel and it leaves a line of little marks which looks very decorative I think you will agree. You will have to pass the flannel over it to get rid of any marks left by the wheel.


The last thing is to use a single lipped iron on the heel edges. This is a regular edge iron that I have ground down on a grinding machine. But you can sometimes find original ones.
Place it on the burner until it is very hot. You then run it round the top edge and front edges of the heel. It leaves a line and gives a finishing touch. If the line is not very defined, repeat the process, but put a bit of melted wax on the edge first and work it along the edges. Et voila! Gorgeously finished bespoke shoes.


If you like, you can use the edge of your fudge wheel to make lines too. It looks pretty cool. The sky is the limit and use your imagination.

That is it. Have a good week and happy shoemaking.
PS, very much looking forward to meeting the Shoe Snob on Monday.
Friday, November 12, 2010
Finishing The Sole (Ink And Wax 2 is postponed)
Grrr! All my photos of the second part of finishing the heel and sole edges have been wiped off the camera! And who has used the camera this week? Not me. So the finger of accusation must point in another direction. I wonder who it was?
Anyway, I have had a request to explain how to finish the sole. So after you have glassed and sanded four times, you are ready to finish it.
You have two choices. A natural finish or a coloured one.
With a natural finish, we use polish. This can be neutral, light tan, mid tan or dark tan. The trick is to stop it looking uneven and smeary. And the trick is this. Before you start with the polish, you need to put on a layer of water and let it dry. This has the effect of hardening the top surface so that when you apply the polish, it goes on evenly. You can also add a tiny little bit oxalic acid to the water. Or some gum tragacanth. These have a bleaching effect and also harden the surface.
When you start with the polish, use a cloth. Rub it round the polish briefly to warm it up. Apply it in small amounts and brush it on in the same direction with your finger, starting at the toe. Be sparing and do many quick strokes from polish tin to sole, building up an even coat of polish. You will see how the leather darkens. Try to get it even. If you put the polish on too thick, you will get dark patches.
You do get a few dark parches anyway, but leave the sole for about an hour and the patches disappear.
After an hour, buff the sole with a cloth, but do it very gently. Caress it. You will see how the surface goes shiny.
Put another layer of polish on in the same way. You might get dark patches again but they should fade. Another hour.
Buff again and you should have a natural shiny surface.
If you want a solid finish, you need to use the same ink as on the heel and sole edges (last week). Just paint it on and let it dry.
Then put a generous layer of polish on. At this point you need to iron the sole with your heel iron. Heat it up but it must be quite cool, cool enough to touch. The polish will go shiny and marked.
Polish again, but rub hard and fast so that it melts and goes even and shiny. The more layers you do, the glossier the finish.
You can use nylon tights at the end to get a wonderful shine.
And that, as they say, is that.
I really love shoemaking and feel very lucky to be able to do it every day. And I am really pleased that there are so many of you who share my passion, so thank you for visiting the blog.
Next week there will be another riveting exposé, so, until then, happy shoemaking!
Friday, November 5, 2010
Ink And Wax
Back in the saddle after a very wonderful birthday weekend in Amsterdam and Brussels. We stayed on a houseboat which was a lot of fun, the quintessential Amsterdam experience.
This week I finished a pair of quite interesting shoes, not so much for the design (which is quite lovely) but for the difficulty of the fit. A very wide joint; surgery on painful joints; very flexible shoe needed (sound familiar?).
The client was concerned that his shoes would look freakishly wide, but I think you will agree that they don't. He is very pleased with them, so I am pleased too.
We used a light flexible insole to help and a lightweight leather shank. He also wanted a sticker sole to protect the sole and stop slipping. I think the addition of tacks not only looks good but helps keep the Topy on.
The design is our classic Extreme Brogue (as described in Mens Flair as "top of the lot"), with the extra brogueing patterns on the counter and vamp and the plain seams (no gimping). It gives the shoe a sleeker more modern look.
Rather lovely in fact.


Now, you get to the end of your shoes and you know that you have done a good job. Solid construction, good quality leather, but if you don't finish them well, then they will be badly judged. And if they are for a paying client, it is all they will see. So you have to finish your shoes well.
Having rasped, glassed, sanded the heel edges and sole edges, you are ready to ink them and wax them. The last jobs to do.
The first thing you need to do is key the surface of your glassily finished edges. Use a very high grit paper like 240 and very gently key the surface.


We use Quick ink made by WH&B, but you should use any ink specially made for leather, particularly shoes if you can find it. Try repairers suppliers. You must mix the ink up first to get the full colour.


With a fine paintbrush, ink the heel edges and the sole edges, including the welts and waists. The advantage of this ink is that it is water based, so that if you get it on the upper, you can clean it off with water.


Make sure the ink is completely dry.
We use Astral Wax for the next process. It is a specialist wax for this process but is now no longer available. Again try a cobblers suppliers for a specialist wax. Yankee wax is also ok.
I always put the wax on the heel first, so put your heel iron on the burner and in the meantime, start putting the cold wax on the heel. I rub it on from the block.


When the iron is hot, rub it on the wax to melt it onto the heel edge. Put the iron back on the flame and repeat the wax process, melt the second layer and do it a third time.
Do it on both shoes.

Next we do the sole edges. I do this slightly differently. I briefly heat the wax in the flame and rub the liquid wax on the edge. Do the waist too.


Put the edge iron on the flame. Heat it until when you lick your finger and put it on the iron, it fizzes slightly. Be careful!
Run the iron along the edges so that the wax melts into place. Make sure you do it so that the bottom edge leaves a little line of wax on the sole (for aesthetic reasons).


Do the same thing with the waist if you have done a bevelled waist.

Next week I will show you how to tidy all this up and make the finished shoe look beautiful.
Until then, happy shoemaking.
This week I finished a pair of quite interesting shoes, not so much for the design (which is quite lovely) but for the difficulty of the fit. A very wide joint; surgery on painful joints; very flexible shoe needed (sound familiar?).
The client was concerned that his shoes would look freakishly wide, but I think you will agree that they don't. He is very pleased with them, so I am pleased too.
We used a light flexible insole to help and a lightweight leather shank. He also wanted a sticker sole to protect the sole and stop slipping. I think the addition of tacks not only looks good but helps keep the Topy on.
The design is our classic Extreme Brogue (as described in Mens Flair as "top of the lot"), with the extra brogueing patterns on the counter and vamp and the plain seams (no gimping). It gives the shoe a sleeker more modern look.
Rather lovely in fact.


Now, you get to the end of your shoes and you know that you have done a good job. Solid construction, good quality leather, but if you don't finish them well, then they will be badly judged. And if they are for a paying client, it is all they will see. So you have to finish your shoes well.
Having rasped, glassed, sanded the heel edges and sole edges, you are ready to ink them and wax them. The last jobs to do.
The first thing you need to do is key the surface of your glassily finished edges. Use a very high grit paper like 240 and very gently key the surface.


We use Quick ink made by WH&B, but you should use any ink specially made for leather, particularly shoes if you can find it. Try repairers suppliers. You must mix the ink up first to get the full colour.

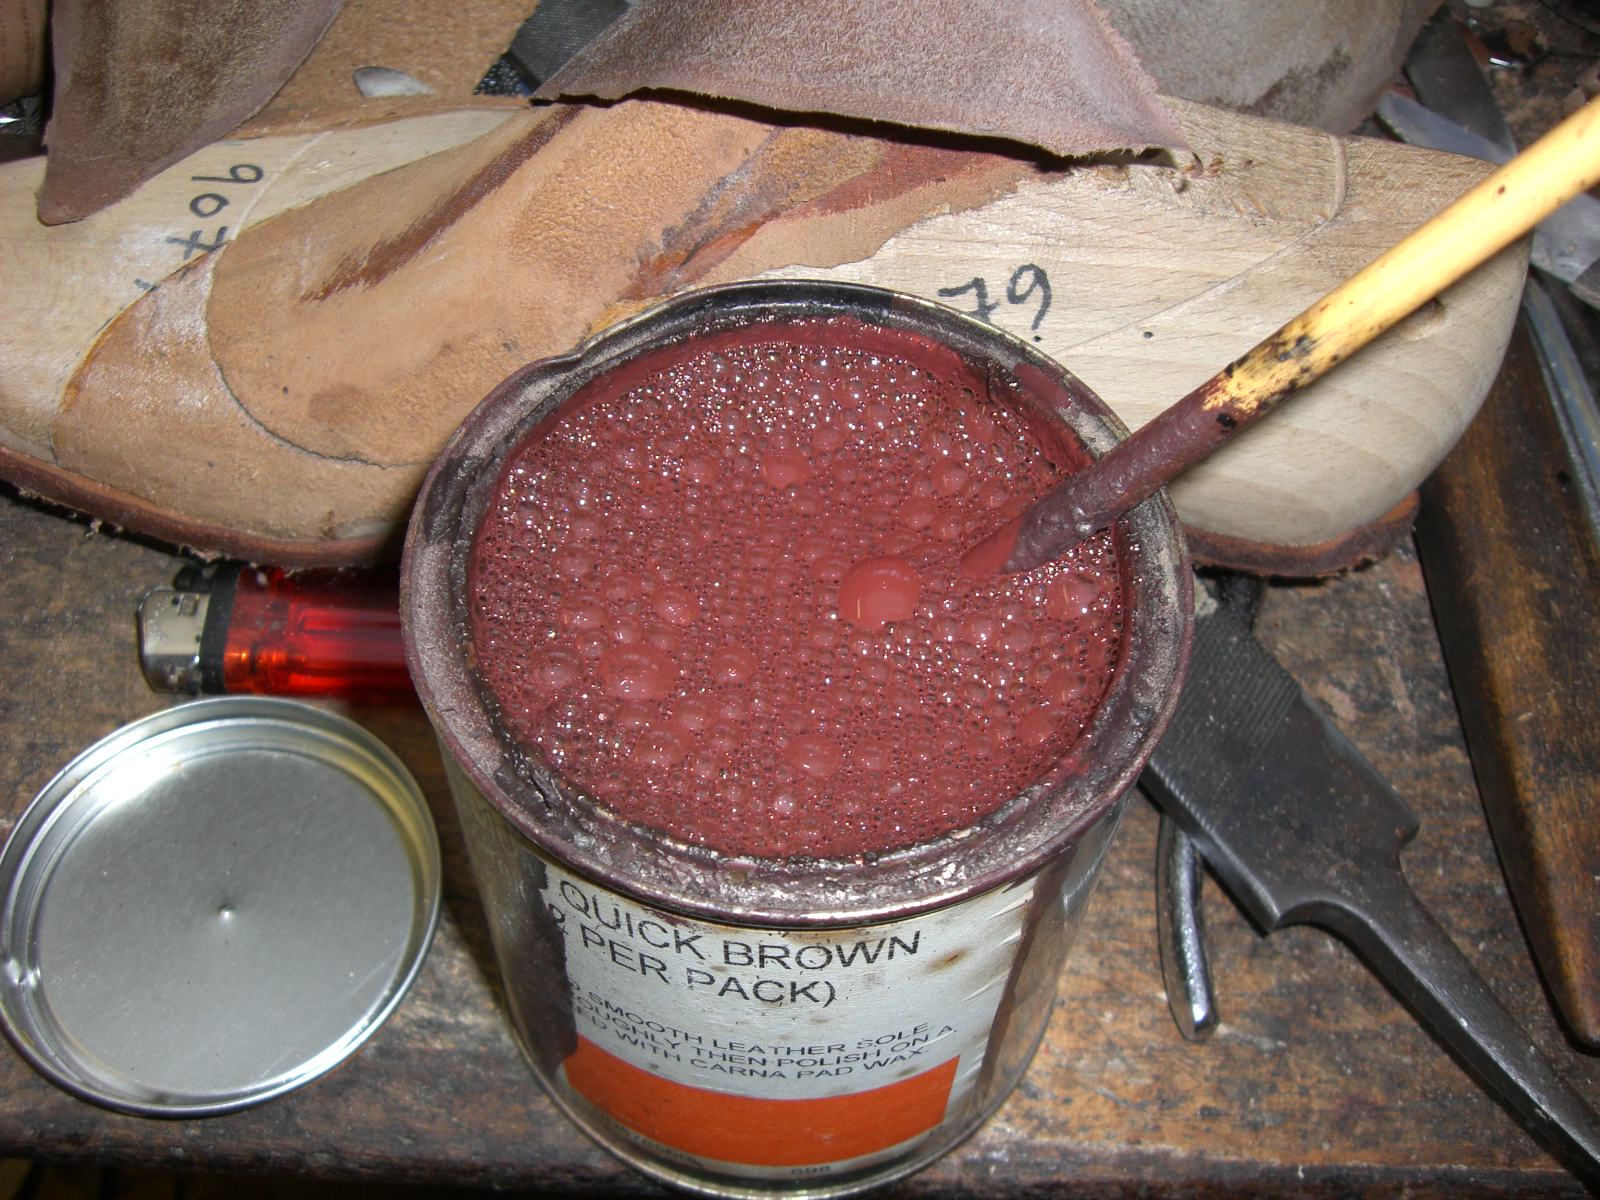
With a fine paintbrush, ink the heel edges and the sole edges, including the welts and waists. The advantage of this ink is that it is water based, so that if you get it on the upper, you can clean it off with water.


Make sure the ink is completely dry.
We use Astral Wax for the next process. It is a specialist wax for this process but is now no longer available. Again try a cobblers suppliers for a specialist wax. Yankee wax is also ok.
I always put the wax on the heel first, so put your heel iron on the burner and in the meantime, start putting the cold wax on the heel. I rub it on from the block.


When the iron is hot, rub it on the wax to melt it onto the heel edge. Put the iron back on the flame and repeat the wax process, melt the second layer and do it a third time.
Do it on both shoes.

Next we do the sole edges. I do this slightly differently. I briefly heat the wax in the flame and rub the liquid wax on the edge. Do the waist too.


Put the edge iron on the flame. Heat it until when you lick your finger and put it on the iron, it fizzes slightly. Be careful!
Run the iron along the edges so that the wax melts into place. Make sure you do it so that the bottom edge leaves a little line of wax on the sole (for aesthetic reasons).


Do the same thing with the waist if you have done a bevelled waist.

Next week I will show you how to tidy all this up and make the finished shoe look beautiful.
Until then, happy shoemaking.
Subscribe to:
Posts (Atom)