Sadly, we never had the pleasure of meeting Mr. Stefano Bemer, but Justin Fitzpartick aka The Shoe Snob not only met, but worked with him. We would like to share his tribute with you. The Shoe Snob: A Tribute To Stefano Bemer:
...and to pay our own respects to a fellow craftsman passionate about shoemaking, determined his work should never be under-valued and generous in sharing his skills and enthusiasm. Our thoughts are with his family and friends.
Monday, July 30, 2012
Friday, July 27, 2012
Workshop Snapshot
We had an exciting week this week. As the Olympics is about to start, the whole of London is decked out in flags and banners. It looks clean and beautiful - hope all the visitors agree.
As part of the bigger picture, there is an organisation called the British Business Embassy which is an opportunity for UK businesses to shmooze foreign dignitaries and business people. It is located in Lancaster House which is nestled between Buckingham Palace and St James's Palace. A very grand 18th Century neoclassical house, it is usually filled with fusty old furniture, but for the Olympics, British Business Embassy have filled it with contemporary British furniture, art and craft. And we were included! So on Tuesday, all the contributors had a reception. We were in good company with the likes of Damien Hurst and Grayson Perry, we felt very grand. And out of the hundreds of contributors, we got a name check in the speech from the head honcho - excellent!
But back to more mundane matters. This week we thought we would give you a little snapshot of the life in a shoemaking workshop.
One of the most exciting parts of shoemaking is the transformation of a design into an upper. You never quite know how your designs will turn out.
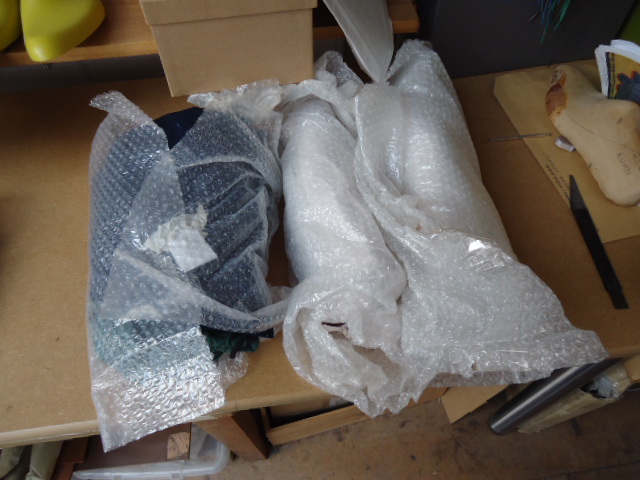
So getting a package from one of our closers is always good.

The wrapping comes off.

3 pairs of uppers, all safely wrapped in bubblewrap.

First up an adjustment on these gorgeous button boots. The leather is shrunken calf. They shrink the calf skins and it results in a natural grain which is uneven and lovely. Not like the standard stamped grains you usually get.
Suede quarters; plum glace kid lining; and antique resin buttons.

Next up is an antiqued wing cap Oxford. Monogrammed medallion - nice shoe. These are a second pair, so we can go straight ahead and make them.

The closer pulls one of the uppers over on the last to check that it fits properly.

The pattern is returned with the uppers too.

Lastly is a black Derby with red glace kid lining and red slip beading on the top edge. The last has an elegant chisel toe and will make a lovely shoe.

Patterns back with us too. These are for a fitting, so we will brace them onto an insole and get the customer in to see how they fit.

So we have plenty of work to be getting on with next week.
And that was the highlight of our day yesterday. Hope you enjoyed sharing it with us.
Until next week, happy shoemaking!
As part of the bigger picture, there is an organisation called the British Business Embassy which is an opportunity for UK businesses to shmooze foreign dignitaries and business people. It is located in Lancaster House which is nestled between Buckingham Palace and St James's Palace. A very grand 18th Century neoclassical house, it is usually filled with fusty old furniture, but for the Olympics, British Business Embassy have filled it with contemporary British furniture, art and craft. And we were included! So on Tuesday, all the contributors had a reception. We were in good company with the likes of Damien Hurst and Grayson Perry, we felt very grand. And out of the hundreds of contributors, we got a name check in the speech from the head honcho - excellent!
 |
| Garden At Lancaster House |
 |
| Deborah In The Garden |
But back to more mundane matters. This week we thought we would give you a little snapshot of the life in a shoemaking workshop.
One of the most exciting parts of shoemaking is the transformation of a design into an upper. You never quite know how your designs will turn out.
So getting a package from one of our closers is always good.

The wrapping comes off.

3 pairs of uppers, all safely wrapped in bubblewrap.
First up an adjustment on these gorgeous button boots. The leather is shrunken calf. They shrink the calf skins and it results in a natural grain which is uneven and lovely. Not like the standard stamped grains you usually get.
Suede quarters; plum glace kid lining; and antique resin buttons.

 |
| Detail Of The Buttons |
 |
| Military Ribbon Tug |
Next up is an antiqued wing cap Oxford. Monogrammed medallion - nice shoe. These are a second pair, so we can go straight ahead and make them.

The closer pulls one of the uppers over on the last to check that it fits properly.

The pattern is returned with the uppers too.

Lastly is a black Derby with red glace kid lining and red slip beading on the top edge. The last has an elegant chisel toe and will make a lovely shoe.

Patterns back with us too. These are for a fitting, so we will brace them onto an insole and get the customer in to see how they fit.

So we have plenty of work to be getting on with next week.
And that was the highlight of our day yesterday. Hope you enjoyed sharing it with us.
Until next week, happy shoemaking!
Thursday, July 19, 2012
Keeping it clean! Canvas & fabric
This week sees the second in our series of 'Keeping it clean' blog posts and we're focusing on canvas and fabric shoes. (Ah, the irony, as the rain teems down outside).
Although this post is really written for shoe wearers, here's a brief reminder to all of you shoemakers out there to cover any fabric, canvas, suede or nubuck shoes you are working on as soon as you have them lasted.

- Wash and dry your hands thoroughly before you start lasting and try to avoid touching the upper so that you don't transfer the 'steel' stains from the nails to the upper).
- Once you have lasted one shoe, heat and stretch your shoe covers over it.
- Then repeat for the second shoe.
- Check that there are no holes in the cover and that there is nothing caught between the upper and the cover on the inside!
- Finally, add an extra cover around the top of the last if there are any gaps to seal the upper totally

The best approach, as with most things, is to protect them BEFORE you wear them. Here's how:
- Spray with a special fabric protector - I use upholstery spray on my resort shoes works well - to provide a protective coating, making splashes and stains easier to remove
- Spray with a starch spray to help the fabric to keep its shape and stay looking new for longer
But if you do fall foul of the sangria here's how to get tough stains out:
- Use carpet shampoo to clean heavily stained fabric or canvas (do a test first on a small area in the inside waist).
- Froth up to a lather and then scrub with an old toothbrush. Allow to dry.
- Clean off everyday marks with a cloth dipped in water. Once the fabric is clean, rinse away the soapy water with a clean cloth that has been wrung out in warm water. Then sponge the shoes dry.

Friday, July 13, 2012
Finishing - Tips and Tricks 2
Welcome back, shoe people, to the second instalment of the finishing post. After last week's breathlessly exciting Part 1, I am sure you are chomping at the bit for more. So here you are, fill your boots.
When you have glassed, everything looks pretty smooth and you think, I could leave it like this. Well, you can't. As soon as you put on the ink, all the imperfections show up.
So you have to use the sandpaper. One thing that does happen when you rasp and glass, is that the 1/4 rubber on the heel seems to rasp at a different rate to the leather, so it sticks out a bit. I use the tip of the knife to just cut the lip of the rubber off so that when you sand, the edge is more even.

So, start sanding. I use a block and start with 80 grit aluminium oxide paper. Press hard and go all the way round in an even, controlled way, making sure that every surface is done thoroughly.
Don't forget the heel breast.

At this stage it is important to do one shoe first, then the other. This way you know that you have done all the stages on both shoes. Here, the custom is to do the left shoe first.
After the 80 grit, use 120.
Make sure you concentrate on the 1/4 rubber and make it as smooth as you can. It should get pretty smooth.

At this stage, I do the edges, but you can finish the heels entirely first if you prefer.
For the edges, I get a piece of emery cloth and glue both sides. Then roll it up to form a solid roll. I wrap the paper around this and use it on the edges. The reason is that the edge iron has a convex surface and it is good to get a concave surface on the edge, and this achieves it.

Use 80, 120 and 240 grit on the edges and waist.


This is what the 240 looks like after sanding. It is very fine and the finished edge should look smooth and glassy.

Now back to the heel. The last stage is to use a fine sanding foam block. Use the finer side. Wet the heel and use the block in light motions in one direction. Lift it off and go back and repeat many times. But make sure it's only one direction. The surface should get really smooth and the grain will sit in one direction and look lovely.


This is how it should look.

You are now ready to finish the sole and top piece surface. When you come to ink the heel, you might need to undo the good work you have done by keying the surface with some light sanding. If you don't, the ink can just sit on the surface and rub off when you take off the excess wax. You will have to experiment.
If you use this method and practice, you should get a really nice finish. The most common problem is where the lifts meet. It is just a question of doing each stage very well and not leaving any blemishes at any stage. Also, don't use contact adhesive to glue the heel lifts together. It leaves a little layer. Use paste and nails.
Hope this is useful and we are happy to answer questions.
Until next week, happy shoemaking
Friday, July 6, 2012
Finishing - Tips and Tricks
Greetings once again, dear readers and welcome to this week's post. I hope you enjoy it and find it informative.
I sit here in our spacious workshop with yet another band of persistent rain sounding on the roof and I'm thinking that our beloved Olympics might be a bit of a washout. That would be such a shame. I am pretty excited about the whole thing, apart from the fact that I applied for loads of tickets and got absolutely none. A bit gutted about that, but there you go. I will still enjoy the vibe.
Many of the comments and questions we receive are about finishing. Now here's the thing about finishing. Once you are ready to start finishing, the shoes are structurally ready to wear. Everything is built and functional. In theory, you could take the lasts out and wear the shoes. Except that they look terrible, rough and unfinished.
So finishing is just an aesthetic process with no structural value.
But don't think that it is not important. It is probably the most important skill in shoemaking from a customer's point of view. It is what they see first and what they judge the shoes on - finishing, shape and proportion. A well finished shoe will sell itself, even if the construction and quality of the leather is poor.
So it well worth concentrating on it and perfecting your skills.
And this is where you start. You have the heels built and shaped with your knife. Please note that the shape of the heel is determined by the knife, not by the rasp. Once you start rasping, you are only dealing with imperfections, lumps and bumps.


The shape must be created with the knife, not the rasp.

This is the kind of rasp we use. Japanese ones are best. I've had this one for about 4 years and it is still going strong. Highly recommended.

Ok, wet the surface with water, including the edges and waist.

Start at one end of the heel and work in one direction. The rasp works only when you push it away from you. Press firmly and work consistently, making sure that you get rid of any imperfections. The idea is to get a perfectly smooth surface. Every stage in finishing depends on the previous one, so if you don't rasp well, the finish will not be glassy.
To protect the upper from the rasp, hold your fingers against the upper. Better to rasp your fingernails than your uppers!


Rasp the 1/4 rubber if you have one and the heel should look like this. There are rasp marks, but no lumps or bumps or knife marks.
The heel should be straight with clean lines.

After rasping, comes glassing. This stage deals with the rasp marks you have created getting rid of the knife marks. As I said, it's all about doing it in stages.
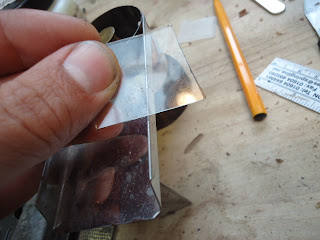
You need 2mm glass from a picture framer. They have waste glass they are usually willing to give you. Be careful with though as it will cut you very easily.
You need to get a curve on the edge in order to glass the edges. This is done by nicking the edge of the glass with another piece.

Like this.

Then you rest the nick on a sharp edge like your burner or a table edge. Hold the glass at about a 45 degree angle and push down and away from the nick at the same time. The glass will break and hopefully in a curve.
Like this. You will probably need to practise a bit to get a good curve.

To glass the leather, wet it with water and scrape the surface with the curved edge of the glass. One edge is always sharper than the other, so test both out. Scrape in one direction until all the rasp marks are gone. The surface begins to look very smooth now.


I think that is a good place to take a break. Next week, we will look at sanding. But until then, happy shoemaking
I sit here in our spacious workshop with yet another band of persistent rain sounding on the roof and I'm thinking that our beloved Olympics might be a bit of a washout. That would be such a shame. I am pretty excited about the whole thing, apart from the fact that I applied for loads of tickets and got absolutely none. A bit gutted about that, but there you go. I will still enjoy the vibe.
Many of the comments and questions we receive are about finishing. Now here's the thing about finishing. Once you are ready to start finishing, the shoes are structurally ready to wear. Everything is built and functional. In theory, you could take the lasts out and wear the shoes. Except that they look terrible, rough and unfinished.
So finishing is just an aesthetic process with no structural value.
But don't think that it is not important. It is probably the most important skill in shoemaking from a customer's point of view. It is what they see first and what they judge the shoes on - finishing, shape and proportion. A well finished shoe will sell itself, even if the construction and quality of the leather is poor.
So it well worth concentrating on it and perfecting your skills.
And this is where you start. You have the heels built and shaped with your knife. Please note that the shape of the heel is determined by the knife, not by the rasp. Once you start rasping, you are only dealing with imperfections, lumps and bumps.


The shape must be created with the knife, not the rasp.

This is the kind of rasp we use. Japanese ones are best. I've had this one for about 4 years and it is still going strong. Highly recommended.

Ok, wet the surface with water, including the edges and waist.

Start at one end of the heel and work in one direction. The rasp works only when you push it away from you. Press firmly and work consistently, making sure that you get rid of any imperfections. The idea is to get a perfectly smooth surface. Every stage in finishing depends on the previous one, so if you don't rasp well, the finish will not be glassy.
To protect the upper from the rasp, hold your fingers against the upper. Better to rasp your fingernails than your uppers!


Rasp the 1/4 rubber if you have one and the heel should look like this. There are rasp marks, but no lumps or bumps or knife marks.
The heel should be straight with clean lines.

After rasping, comes glassing. This stage deals with the rasp marks you have created getting rid of the knife marks. As I said, it's all about doing it in stages.
You need 2mm glass from a picture framer. They have waste glass they are usually willing to give you. Be careful with though as it will cut you very easily.
You need to get a curve on the edge in order to glass the edges. This is done by nicking the edge of the glass with another piece.

Like this.

Then you rest the nick on a sharp edge like your burner or a table edge. Hold the glass at about a 45 degree angle and push down and away from the nick at the same time. The glass will break and hopefully in a curve.

Like this. You will probably need to practise a bit to get a good curve.

To glass the leather, wet it with water and scrape the surface with the curved edge of the glass. One edge is always sharper than the other, so test both out. Scrape in one direction until all the rasp marks are gone. The surface begins to look very smooth now.


I think that is a good place to take a break. Next week, we will look at sanding. But until then, happy shoemaking
Subscribe to:
Posts (Atom)