Hi there, just a quick update from The Other One on the course before the weekend.
It's been an emotional week for our new students. They are a great bunch and are really giving the course their all but we don't call it an intensive course for nothing! There have been deeply felt highs and lows, aching hands, shoulders and egos to be soothed and some tough love to try to keep them on track with their making.
Learning something new as an adult is hard at the best of times, so hats off to them for showing such great determination and strength of personality this week. This is a highly skilled craft to learn.
The first day was spent getting to know their knives, sharpening them up and then skiving the toe puff and stiffeners. They also blocked over their insoles ready for the next day. It's fair to say that skiving is not a popular task (even we are not big fans) and there were many questions about machines to do the same task. They do exist, but we're keen for our students to become adept at using a knife - skiving machines are expensive and we try to run the course so as few tools as possible are needed.
The next day the holdfasts for welting and the insoles were prepared, ready for lasting and the welting threads were made - we roll our own threads using hemp tipped with bristles. We've come to see how personality plays a part in shoemaking - as students have become frustrated with their lasting, welting or stitching the task has become harder and harder. Especially the threads, which warm up in hot hands and become more and more sticky and difficult to work with. The warm thundery weather hasn't helped and I think we might invest in a mini fridge for the next summer course to keep the threads cool!
So, the last two days they have really come to appreciate just
- why the bristles have to be attached just so
- why the holes in the holdfast should be made with one clean movement
- why the toe puffs need to skived thinly
- and why the excess material after lasting needs to be trimmed away
I've never put on so many bristles in one afternoon!
Anyway, they all headed home this evening to continue their hard work ready for James to tomorrow.
Good luck everyone, enjoy it and see you next Saturday for the last day!
Friday, July 30, 2010
Making Packs And Covers
Well, here we are in the middle of our carreducker shoemaking course. The Other One is teaching this week, so I have not had that pleasure yet, but I am taking over tomorrow. Really looking forward to it.
We have eight students this time, from Australia, Canada, Holland, Germany, London, Singapore and Malaysia. They seem very nice and are getting on well. I will let you know more next week.
So, moving on to this week's subject. Following on from last week, I am going to give you details of our Making Packs. These are for those of you who want to make at home, but find it difficult to get all the tools, leather, uppers etc. Also for students who have done one of our courses and who want to carry on making.
The advantages of buying the packs like this are many. If you bought all the leather yourself, you would have to buy whole hides which are large and expensive. Some of them are enough to make 10 or more pairs of shoes.
You would have to have a last in the size you want to use.
You would have to make patterns.
And you would have to buy a whole upper skin, lining skin and close the uppers.
Making Pack 1
This is the complete pack which will allow you to make a pair of handsewn shoes as long as you have the tools to do it. All the rough stuff is English oak bark tanned cow hide, very good quality.
It includes:
A pair of standard lasts in a size of your choice.
A pair of calf uppers in a colour of your choice to fit the above last.
Insoles
Welts
Shank
Cork Filler
Soles
Split lifts
Heel Lifts
Heel Top-Pieces
Cost £400
Making Pack 2
This pack is for those who have bought Pack 1 and want to make another pair.
This pack has the same content as Pack 1 minus the lasts.
Cost £320
Tool Kit
This is a basic tool kit with the specialist tools and waxes you will need to make a pair of handsewn shoes. There are other tools you will need but these are generally available from hardware stores.
It contains the following tools:
Lasting pliers
A flat knife
Welting awl blade and handle
Stitching awl blade and handle
Shoemakers tape measure
Silver pen
Sleeking bone
French shape hammer
1 edge iron
1 heel iron
Bristles
Finishing wax
Hemp thread
Thread wax
Cost £300
NB if you live in the UK or the EU, we have to charge VAT on these prices.
This is quite an exciting development and should make your lives much easier. You will be able to concentrate on shoemaking rather than sourcing all the materials, which can be very time consuming and expensive.
Moving on, I had a request to explain how to keep the shoes clean and protected while you are making them. I could say be careful and don't get any glue on them. This is something you should try to do, however accidents happen and some leathers are more delicate and need protecting.
Traditionally we used cotton covers which were lasted over the uppers before welting. The problem with this is that cotton is absorbent and not particularly good as a protective layer.
Nowadays, we use plastic covers. You can buy specially made shoe covers which are used in the industry. These are very good and easy to use. You simply heat them with a hair dryer and stretch them on. They then shrink onto the shoe as they cool.
However, there is a simpler, more accessible solution. You can use food/freezer bags. And here's how you do it.
You start with a pair of shoes which you have lasted and are ready to welt.

Take your food bag.

These bags have a seam where they have been heat sealed together. This seam splits very easily. So split it so that it is open on one side.
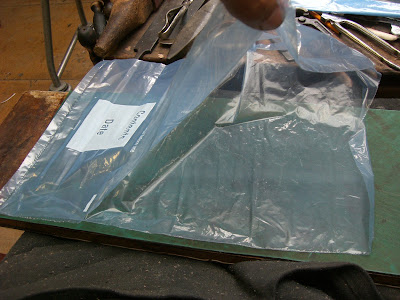
Put your shoe in the corner of the bag and turn it over.

You need to pull the bag tight.

You are then going to cut the bag with your knife giving yourself a margin of 2cm at least. Avoid hitting the nails when you cut the plastic. Cut around the toe to the joint. Then do the same around the heel.

This is how it will look when you have trimmed it.

Now you need to to put contact adhesive around the nails and the edge of the shoe. Try not to get it too near the edge because when you squash the bag down you don't want the glue to go on the upper. Be quick so the glue does not dry.

Quickly squash down the bag all at once. Hold ot all down for a minute or so and the bag will stick.

The area of the waist is a bit problematic. Use some sticky tape to pull it tight.

Then put a strip of tape around the feather edge. This gives a little extra protection and holds the cover in place.

You now have your covers on and are ready to welt as normal. Right at the end of the finishing process, when everything is completed, you gently cut the covers away with a knife, right in the welt so that you don't see the covers. It works! Your uppers will be clean and unblemished.

So there you are. Hope this helps.
Until next week, happy shoemaking.
Friday, July 23, 2010
Summer Course
First things first. We at carreducker would like to congratulate our ex-student Makoto Taguchi on his magnificent degree collection. We love his shoes and really appreciate his use of the traditional handsewn techniques he learned with us in his very modern designs. Very well done Makoto! And may you be an inspiration to our new students.
Which leads us nicely on. The carreducker summer handsewn shoemaking course starts on Monday. We are really looking forward to it. The contraction to two weeks seems to have appealed to potential students and we have much more interest than places. Hence the launch of a new London course in January.
The dates are:
Monday 10th January 2011 till Saturday 22nd January
9.30am - 5.30pm
96 hours teaching time in the classroom
£1650
There are 4 places left. If you are interested, please email us for more information
cd@carreducker.com
You might be asking yourself what happens in the course.
It takes you through the more than 200 processes involved in making a pair of handsewn bespoke shoes. There are no machines involved, only hand held tools, so it is really the traditional English shoemaking techniques you learn. It is purely practical, all making and no theory. You take notes and pictures during the course, but that is the only writing you need to do.
Here is a shot of the student packs ready for Monday and I will open one up to give you a graphic explanation of what goes on.

Inside the pack, you will get a pair of uppers and a corresponding pair of lasts which the uppers will fit. We prepare both of these before the course. This means that the student does not design an upper, make patterns or close the upper. This would have to be the content of another course.
We ask the student what size they are and give them a last and upper in that size. This does not guarantee a bespoke fit, but it should be close. However we can make a bespoke last and upper if you book with enough notice. This service costs £300. It does mean that you can make shoes for yourself in the future.


Next comes the tool kit. This is a basic set of tools a shoemaker would need to make a pair of shoes. It includes a tape measure, knife, welting awl blade, stitching awl blade, awl handles, sleeking bone and lasting pliers. We provide the rest of the tools the students will need.


Lastly is all the hide needed to make the shoes (rough stuff). This is English oak bark tanned cow hide. It includes insoles (from the shoulder); soles (called a bend); heel lifts ( from the bend); top pieces (bought as pre-prepared units with a quarter rubber); toe puffs (from the belly); stiffeners (from the belly); and split lifts (from off-cuts). We buy this in huge pieces from the tanners and cut it to size for the student packs.

We also provide a detailed set of notes which take you through all the processes with room for extra notes and pictures and give you a list of resources for buying tools and equipment.
And that,as they say is that. It is now up to the students to do the work and make the shoes.
It is a challenging course, lots of hard work, but it is suitable for people with no previous craft experience. We say that everyone is capable of completing the course and we have never had anyone who has not finished their shoes. And because the numbers are kept low, you get a lot of individual attention.
As a complement for the course and for those who are making bespoke shoes on their own at home, we have launched a set of Making Packs for sale around the world. They will give you everything you need to make a pair of shoes, lasts, uppers, rough stuff. There is also a complete tool kit.
Now I have whetted your appetites, I will give details of this next week. Email us if you can't wait till then.
So until next Friday, happy shoemaking.
PS I have been asked for an explanation on how to keep the uppers clean while working. Next week, I promise, and sorry for delay.
Friday, July 16, 2010
Cutting A Channel
With the heatwave over, we can work much more comfortably in our workshop. In fact, we had a tropical downpour midweek, which left us with water leaking all over our work on the shelves. Not good! A typical British summer then.

This week, we have had an intern working with us from the Brit School, who was delightful and a pleasure to work with. He even designed a shoe with us which we think we are going to sample. Watch this space.
We have had a request from a shoe mender for a description of cutting a channel in a sole. So Simon, here you go.
Most leather soled factory shoes are stitched straight through the sole into a groove which protects the stitches. While this method is perfectly functional, it is not the most aesthetically pleasing option, as the stitches remain visible.
With handsewn bespoke shoes, we always hide the stitches by cutting a channel. This is a flap cut into the sole, which is lifted, so that when the stitches come through and the flap is flattened down again, they end up being hidden and, thus, invisisble.
You end up with a perfectly smooth and unblemished sole - gorgeous!
Once your shoe is welted, the shank and cork filler put in, you are ready to attach the sole. The first thing to do is soak your sole leather. This is vital because if you don't, it will be too hard to cut the channel.
Soak for at least an hour and then leave it to dry until it is mellow (about 85-90% dry). At this stage, the leather should still be flexible and supple and dry enough for the glue to work.
Place the shoe on the flesh side and draw round it leaving a 5mm margin and a 1cm one around the heel.

You now need to hammer the sole to compress it so that it lasts longer. If you don't do it, the sole will wear out very quickly. Don't hammer the edges however, because it will be too difficult to stitch through.
You need to use a flat hammer. If you don't have one, grind a domed one down on a grinding machine.

Now trim the sole to the line.

Place the shoe on the sole and holding the two together, trim closer, so that not much spare sticks out. If you don't need to aim for a specific final sole thickness, you can leave more spare leather. If you need a specific final sole thickness, you need to skive the sole to the desired thickness and then trim it very close to the welt. At the end of this process, draw a line on the sole where the welt sits, so that you can place the shoe on the sole accurately after you have glued it.

Now you are ready to glue the sole on. Use rubber solution because if you need to repair the shoe, you can take the sole off without pulling out the cork filler and the shank. Put the glue on both surfaces and let it dry for ten minutes. Place the shoe onto the sole following the line you drew previously.


You now have the shoe and the sole attached. Turn the shoe over, sole side up. You need to nail the heel in place. Mark your heel points. Draw a line around the sole so that the nails will go in about 1cm away from the edge. The line must finish 1cm from the heel marks.

Using 20mm nails, hammer them about 15mm apart, stopping behind the heel marks. Make sure the nails go in at an angle in towards the centre of the heel. About 15 degrees off vertical.
Leave the top of the nails sticking out.

Clip the top of the nails off with nippers.

Punch the nails with a punch so that they sit just under the surface.

Trim any excess leather off the sole, so that the welt and the sole are perfectly aligned. You are now ready to cut the channel.

Drag your nail around the edge at 45 degrees so that you leave a mark on the edge. This is your guide for cutting the channel.

Using this guide line, and starting just behind the heel mark, start cutting the channel with your exceptionally sharp knife. Things to bear in mind. You must cut the channel deep enough to stop the stitches making the bumps on the finished sole. But you must not cut it so deep that you cut through the sole. If you do this, you must start again. So no pressure then. Aim to cut about one third the thickness of the sole.
The angle is about 15 degrees and the channel must be about 8-10mm wide.
Go all around the shoe to just behind the other heel mark.

Open up the channel with a screw driver.

Now you need to make a small groove in the channel for the stitches to sit in. I use a broken awl which I have sharpened into a point.
Drag it round the channel on the inside edge.

You are now ready to start stitching.
By the way, that paste oozing out of the shoe in the last picture is because I use paste on the welt because rubber solution can leave a tiny line on the finished edge. Paste avoids this problem but is more of a fuss to do. Your choice.
Hope this is clear. Please get in touch if you have any queries.
Good luck and until next week, happy shoemaking.
Friday, July 9, 2010
Leather Sole, Rubber Sole
Back and refreshed from a wonderful holiday in Venice, I am well and truly into the groove of work again. It has been a bit manic here this week with two clients champing at the bit for their shoes and the Other One in Southwold. I have delivered today, so I can relax and do something more pleasurable, like write a blog post.
While in Venice, I went to see two shoemakers. The first was Giovanella Zanella, Calle Carminati, Castello 564. Unfortunately her shop was closed for lunch, so all I saw was the window display, which, I have to say, was crazy and quite wonderful. Mostly for women, the shoes were inventive, marvelous and very personal. I liked them very much.
The second maker was a more successful visit, as her shop was open and we got to talk. Her name is Daniella Ghezzo, the shop is called Segalin, Calle dei Fuseri, San Marco, 4365. She apprenticed, like I did, with a master shoemaker and took over the business when he retired. Her work is very high quality and totally handsewn bespoke. She has the advantage of access to all those wonderful Italian coloured leathers and hence her shoes are full of interesting use of colour. About a 50:50 mix of men's and women's shoes, she says she has a similar mix of locals and tourists. A beautiful shop which made me green with envy. I want one too!
Most of our clients choose a leather sole for their shoes. This has many advantages. One being that you get the full handsewn shoe with a handsewn welt and sole. Another is that the leather is breathable, thus healthier. A third is that they look great, for example, you can have an elegant bevelled waist on a leather soled shoe. But to some clients, these advantages are outweighed by one major issue. Slippiness. Now, I wear leather soles shoes all the time and have never had a slip in wet weather, but some people say they slip and slide around to a dangerous degree. I think it is because of differences in gait, but I don't really know.
So, for these clients, we offer synthetic sole.
The process is the same for measuring, making the last, the upper, and the fittings. We welt the shoe as per usual, except that we welt all the way round the heel, so that it joins up with itself (like a welted seat). Start just behind the heel point where it is still straight. When you get back to where you started, bevel the welt to match up with the bevel you cut on the start piece. Put some glue on the two pieces and stitch through.

The other difference is that we use a leather welt which you can buy by the metre. This is because it is easier to go all the way round a large shoe. You glass and soak it just like a normal welt.


Once the welt has been stitched on, we let it dry and then send it off to the factory to get a synthetic sole stitched on. You are obliged to have a square waist with this construction. They end up looking very nice, and the construction is very strong, but I think you sacrifice some elegance for practicality with a rubber sole. But tell that to the guy who is sat on his backside on the pavement in a storm.
Our course is two weeks away and all in hand, so that is exciting. The sun is shining, it's 28 degrees out there and I am going to sign off and finish early.
So, until next week, happy shoemaking!
Subscribe to:
Posts (Atom)