Hello shoemakers of the world. I have an apology to make - no blog post this week. I am in Brussels, not to fix the next EU budget increase with our vnerable leaders, but to celebrate my birthday. Hooray!
So, until next week, happy shoemaking
Friday, October 29, 2010
Friday, October 22, 2010
New Tool
Busy week making. We have a deadline for Tuesday next week and I am madly trying to meet it. I think we will be ok. I am going to work tomorrow, very dedicated I know. But it's all in the line of duty I suppose.
We delivered a pair of interesting bespoke shoes this week. They were a real struggle to fit, a huge challenge. The client had to come in six times for fittings. But that is what bespoke shoemaking is all about. Some shoes fit perfectly on the first fitting, but others are more taxing.
The problem was the the joint, especially on the right foot. It is really painful, so the client insisted on the very rounded toe shape, so that his feet are not compressed in any way. He also had a very low toe box in front of the joint, so the scoop down from the instep is very pronounced. And he was concerned about the vamps not creasing when he walks, so the fit had to snug enough to avoid this. It was a balancing act. But we did it! And the result is a comfortable and idiosyncratic shoe. I grew to like the shape!


Next, I must say a big thank you to my friend Marcell Mrsan of Koronya in Budapest. He recently sent me a new tool. Now, I am a bit of an old school maker; resistant to change; stuck in his ways; you know the type. So I am reluctant to try new things. But when an ex student of ours, Seiji, came to work with us for a couple of weeks with his new fangled tools, I tried it, and, amazingly, I loved it. And within two weeks, he had told Marcell and he had sent me one. Fantastic. So a massive thank you goes to both of you.
What is this amazing tool? Well, it's called a feathering knife and it is used for cutting the feather or holdfast. A simple task you may think, but, until now I have been using a flat knife, which is fine, but it is hard to get a level flat cut, both the vertical and the horizontal one. This tool sorts this out.


And here is how you use it. You prepare your holdfast as usual by marking the lines with a pen (is this a whole new blog post?). You must still use your flat knife to make the first incision, about 2mm deep around the first line.

Wet the cut with water. This helps the next step.

Open the cut with a screwdriver.

Now comes the new tool fun. Previously I would do this with the knife and you are cutting blind with it, so it is quite a hard technique. With the featering knife, you simply place the tool in the beginning of the cut and away you go. The depth is constant and it takes seconds. I love it!

Just look how neat the cuts are.

On the second line, you do the same thing but hold the knife at a 45 degree angle. This makes the holdfast stronger.

Wet as before. Open it up, and cut with the new tool, this time following the angle. Et voila! A lovely neat holdfast.

Friday, October 15, 2010
Shanks 2
Bit of a stressful week! Deadlines, late deliveries, jangling nerves. All part of the game I suppose. There is a lot to be said for just sitting at my table and working. But life isn't like that. You gotta work to get the clients! But then there are clients and clients. Enough said.
In fact, the huge majority of clients we have are wonderful. I think the bespoke process helps to build relationships which would not normally happen in a retail environment. We meet them a number of times and spend quite a while with them in the end. It is a really fulfilling part of the work.
But back to shanks. Last week we put the leather shanks into the shoes, shaped them and left them. Of course, that is not the end of the process. We now have to fill the forepart. This is done so that when we stitch the sole on, it has a smooth surface. If we did not do it, the shoe would be uncomfortable and look ugly.
We don't use leather here as it is too heavy and inflexible. There are two options for the forepart. Cork (most common) and roofing felt.
There are advantages to both and it depends on your circumstances as to which you choose. Both are fitted in broadly the same way.
Cork is probably the easiest to source and fit. You buy it in sheets or rolls. It is light, flexible and easy to shape.
However, it can, over time, compress and crack which can lead to squeaks (not a common problem).

Felt is more waterproof and will never squeak. It is however, more fiddly to fit. We use it here more often because of the wet weather. We use roofing felt that has been impregnated with tar which waterproofs it. You buy it from builders suppliers.
So here is how you do it. As with the leather shanks, you use chalk to mark the edge of the space to be filled.

Then you place the felt over the chalk mark to transfer it to the felt.
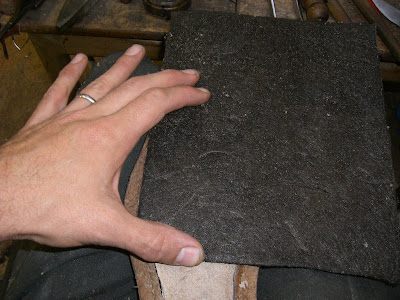
Next you need to cut out the felt. I have a knife dedicated only to this because it is a messy job. I heat the knife on the burner before cutting.

Next you glue both surfaces using contact adhesive. Let it dry for 10 minutes.

Glue the felt in place.

You will notice that the edges stick up and you need to skive with the hot knife. I do the joint area first, followed by the welt area edges. It is important to keep the knife hot and sharp. You will need to look at the middle of the felt. Usually it is domed and you will have to skive it flatter. A little domed shape is ideal, not completely flat.

Hammer the whole thing flat once the felt has cooled down. Otherwise it will stick.

This is the finished shank and filler. It should flow with a smooth, harmonious line.

If you are using cork, do the same thing as above. The only difference is that you use your regular knife for skiving and use a rasp for the middle part. It is super easy and satisfying.
And that, as they say, is that! Hope this is useful to all you aspiring shoemakers out there.
Please feel free to ask me for posts on any specific aspects of shoemaking you are struggling with. I am here to help.
Until next week, happy shoemaking!
Friday, October 8, 2010
Shanks
Ho hum, Friday again. Where does the week go? It's been relatively quiet compared to recent ones, but that is no bad thing. It has meant a lot of time dedicated to making our lovely bespoke shoes.
We delivered a pair of wedding shoes (the day before the big day, which created a bit of stress unfortunately) and finished a pair for a client with very sore feet. They have been sent off to the last maker for trees and we are hoping that they will be a big comfort as he suffers enormously with sore toe joints. He has had operations and wears orthotics which are catered for in the bespoke last. This kind of work is a fairly common part of what we do. While it is not orthopaedic work, we do make shoes for people with minor foot ailments - painful joints, bunions, sore soles, one leg longer than the other, unusual shaped feet etc. These jobs are a mixture of trepidation and pleasure, but a very important service.
Our brave LCF student Michelle has requested an essay on how to make shanks.
Shanks can be made of leather, metal or wood. They are important to give support to the waist area between the heel and the joint. With no shank, this area would sag and make the shoes unwearable.
The higher the heel, the stronger the shank needs to be. Metal shanks are the strongest. You buy them ready made and hammer them into shape, then glue them in place, and finally stitch each end into the insole so that they don't move inside the shoe.
Wooden shanks can be used on lower heels, especially ladies. These are also bought ready made and simply glued into place.
With men's shoes of a standard heel height, we use a leather shank. Use offcut pieces of insole which have a rigidity along with being soft enough to flex and skive.
After welting, take a piece of chalk and draw around the edge where you have trimmed the upper and finish just behind the joint.

Place the shank leather on top of the chalk line and press so that you have the shape in chalk left on the leather.

Draw a pen line on the chalk to help you cut it out.

Cut out the shank and place it on the shoe to check that it fits correctly.

Turn it over and see how well it fits the other shoe. Make any adjustments and cut out the other shank. Remember to turn the first shank over to get the other shoe as they are a mirror image of each other.

You must now either glass the skin side or use the 'killer toothbrush', a vicious scoring tool. This will stop the shank squeaking.

Now you must skive the shank. At the joint line skive to nothing starting about half an inch from the joint. Then skive around the edge of the shank, about 1/4" (5mm). Do both shanks.

Using contact adhesive, glue both the shank and the insole. Let it dry and glue it in place.

Once in place, hammer the shank so that it is firmly fixed in place.

You must now skive the shank so that it is smooth and even and the same on both shoes. This stage will determine the shape of the waist. You can make it flat or curved. This is entirely up to you and is an aesthetic decision.

Finally hammer again make any adjustments to both shoes so that they are the same. And voila, outstanding shanks!

Next week I will do the filling on the forepart of the shoe.
So until then, happy shoemaking.
Friday, October 1, 2010
Trouble With Elves
Every shoemaker (especially those of the old school who make beautiful handmade shoes) needs a couple of elves to help them in their old age to get the work done. You know the deal, I click the leather and in the morning the shoes are expertly hand stitched.
So, being a very wise and forward planning middle-aged shoemaker, I have just such a pair. The trouble is that they need a bit of care and attention to get them to the stage when they can get cracking with the old welting awl.
Well, today is just such a day. With mum called away suddenly, I have stepped into the breach to look after them. And that is why my normal blog pattern has been adjusted. Today it is not a making type blog (although it will be shanks next week, yee ha!). With one little elf at school and the other having a nap, I can jot a few words.

As guardians of the trade of bespoke shoemaking, we do everything we can to encourage new makers. With this in mind, let me tell you about a student at Cordwainers (LCF) who has undertaken a gargantuan task and who should act as a spur to all of you aspiring to make bespoke shoes.
She has to make 8 pairs of fully handmade shoes for a final show. We have seen the designs and the mock ups. She is using wonderful natural products and, to make life even more arduous, she is doing a lot of hand embroidery on the uppers. Yesterday we saw the mock ups which look great. So now all that is left to do between now and mid December is click, close and make the 8 pairs. That is about one pair a week with a bit of contingency time for unexpected hitches.
Absolutely admirable (and a little bit crazy), so from both of us Michelle, the best of luck! We will of course be on hand to help and advise because we are kindly old shoemakers. If you pursue shoemaking for ant length of time everyone, you will find that we are a bunch of generous, if a little nutty, people. Always ready to help.
So, sorry if you were expecting more, but sometimes the little elves need looking after.
Until next week, happy shoemaking!
Subscribe to:
Posts (Atom)