Friday, October 25, 2013

Setting up a shoemaking work space

First off congratulations to Frances, Marco and Mathilde who finished their two-week intensive last Saturday. There were some beautifully finished edges, so much so, that one student was allowed to do a natural finish! See the results for yourselves. 


More and more students want to keep on making, but how much room do you need to set up a shoemaking bench? Well. when we first arrived at Gieves & Hawkes we luxuriated in the 'goldfish bowl' on the shop floor, giving visitors to No.1 a glimpse into the world of Cordwaining. Three years later, we now have a beautiful display of bespoke shoes on the shop floor and we have joined the cutters in the heart of the store's tailoring workrooms.


It is a great working environment and we were fortunate to have a bright, airy space purpose-built to our needs. In terms of space, you really don't need very much, but it is good to use walls and ceilings to their utmost. Good light, ventilation and a sink are a must.

Space wise, you need room to open your arms to their maximum and space to sit behind a low table. Our new space measures some 3m square and incorporates rails overhead to carry our clients' lasts and bends of leather...


a desk for stationery, packing materials, our measuring kit, first aid kit, laptop and telephone. (Underneath is room to store leather samples and laces).


A workbench and chair, standing some 75cm high, with tools in pots and hung from the table edges, a spotlight for close work...


and less-often used tools and materials stored in the antique drawers to the side. Purpose-built shelves to the opposite side, house some of the work in progress waiting to be delivered and for fittings.


Our contact adhesives and burner are stored in a special fire-proof/chemical store cabinet...and other tools and templates are hung on the wall partly as a display, but also within easy reach from the bench.


Hand-held tools are an important part of the storytelling around our brand and product - after all,  they are what we use every day to make our shoes - so it is irksome when other brands try to claim a handmade element in their marketing. The example below is case in point. Can anyone guess which brand these 'handmade' shoes are from?


You'll know what we mean when you see them in reality...fortunately we think that most customers are discerning enough to recognise the authentic from the inauthentic.

Until next week, happy shoemaking!


Friday, October 18, 2013

First October Intensive Shoemaking Course

Welcome back, dear shoe people of the world. Another week flies by in the wonderful world of shoemaking

This week sees the end of the first carréducker Intensive Shoemaking Course in October. Due to the popularity of the courses, we have introduced two new ones each year. A second one in August and one now in October. Rather than turning people away or making them wait for ages, we thought it was better to offer more opportunities to make handmade shoes with us.

Yesterday saw them finishing their heels and today will be spent rasping, glassing and sanding their heels and edges. It's the final push to their own little Everest of completing a pair of hand stitched shoes. So well done to them.


And speaking of students' shoes, we're asked time and again what the quality of the shoes are like that students make on the course. Well, it often depends on the student and their reason for taking the course. This summer, one very determined (and very much in love) gentleman, whose hands had never seen anything other than a keyboard, challenged himself to make his own wedding shoes. So, no pressure!  How did he do? See for yourselves...


A dream wedding in Italy with the groom as resplendent as the bride (well, kinda). Nice job Ira Babb of Texas.


Mr and Mrs Ira Babb 
(Mr Babb is wearing his own dark tan, handsewn, calf shoes with green laces).
Congratulations!

So, you can see that students come to us for all sorts of reasons, although recently, more and more of them are really serious about becoming full time bespoke shoemakers which is really pleasing. This blog has an amazing reach and we are so glad that so many of you read it each week..

So, if you fancy giving it a go, go to our website, download a booking form and book yourself a place. We have 5 intensives next year, 3 pattern making classes and 1 evening class in London.

http://carreducker.com/shoemaking-courses

We look forward to hearing from you.

Until next week, happy shoemaking!

Friday, October 11, 2013

Billecart-Salmon The Duet and Gieves & Hawkes ready to wear

This week we are showcasing the work of a fellow leather craftsman, Mark Tallowin, who shares our love of detail. He visited us last year enthusing about leather work and his vision for handsewn bags. A year on and we were thrilled to be invited to the launch of his most recent collaboration with Billecart-Salmon champagne...which I've named 'The Duet'.


James, provider of delicious champagne and a man with vision


Mr Tallowin revealing the fruits of his labours


The Duet - a hand stitched, bridle leather case for two bottles of champagne


The exquisite 'spine' stitch


And beautifully coloured copper and brass rivets

Continuing the theme of creativity, here is a taster of the new ready-to-wear shoe collection now in store at Gieves & Hawkes to complement Autumn's wool and tweed story. To the fore is a suede Monkstrap and in the vanguard a pebble grain Derby - classic, stylish, with cushioned soles and bespoke details. Nothing to frighten the horses :)


There has been plenty of shoemaking going on this week too, as our October course comes to the end of week 1 and we have shoes aplenty for fittings. Look out for shoemaking news next week and until then, happy shoemaking!


Friday, October 4, 2013

Restoring Old Tools

Welcome back, dear shoe people. We hope you have had a wonderful week

We have two courses starting on Monday. Our first October Intensive Shoemaking Course and our Modular Shoemaking Course returns after a long summer break. So one of us, has eleven hours of teaching on Monday. A seemingly unfair division of labour, but one of us has tickets for Charlie and the Chocolate Factory. Priorities!

Anyway, back to shoemaking.

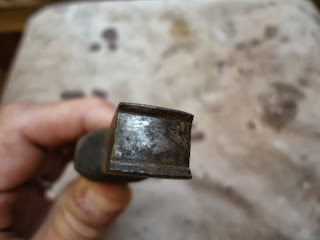
So, you buy some old tools on eBay. You really need an edge iron, but they look quite old and rusty.


Can this lovely old edge iron ever be used again?


Never fear, you can restore it to its former glory. There is a limit to what you can do, but this one is well worth repairing.

You will need some fine metal files. Fine! The triangular ones with flat surfaces are good.


Various aluminium oxide papers, 120, 240, 400 and 1600.
A junior hacksaw blade


First off, you will need to flatten it with a hammer on a metal surface. We use a lap iron. Use the edge of it though because the hacksaw blade can leave little marks on the iron. The reason you do this is because the blade has serrations like a normal saw but the edge is not flat, it waves from side to side. Hard to see from previous pic but if you look at one in the flesh it will be obvious. The effect of this is to make a wide cut mark which is no good for what we want to do with it. we need a narrow cut mark, hence the flattening process.


Start by filing away the worst of the black pitting. This is due to oxidation and the steel oxidises unevenly, leaving a pitted surface. The pits are not deep but you need to file the surface back to get rid of the black bits.
If you have a vice that is perfect, but you can do it in your hands. It is more difficult but possible.


It should look something like this.


Now you need to polish the surface of the iron to make it smooth enough to finish the edges of your soles.

Wrap the coarsest paper around the file and polish. Use progressively finer grades until you get a very smooth, shiny surface.


Now for the grooves at the sides of the iron. These are important. This is where the junior hacksaw blade comes in. If you hadn't flattened the blade, the groove it would cut would be too wide and you would ruin the iron. But having flattened it, you get a nice, narrow groove. It needs to be about 0.8mm deep. Do both grooves, but I wouldn't recommend doing the second of the double grooves on one side. The hacksaw can slip and scratch the iron.


And this is how it should look. I wouldn't worry too much about the black at the sides, it won't affect the finish you get on the edges.


And that's all folks. Until next week, happy shoemaking!