Friday, November 29, 2013

Repairing Old Shoes 3 - Toe Plates

Hello once more, dear readers. Another week goes by in the lives of two humble shoemakers. As Christmas approaches, we are trying to get as many pairs of shoes ready as possible, so that our customers can look resplendent over the holiday period.

If you are in London this weekend, we have our Open Studios at Cockpit Arts. We have some complimentary tickets so if you come, call us when you arrive and we will come and let you in - 02078130093

This week, we had an amazing series of emails from a blog reader in the Philippines. Some good news from there too which is great. Here is what he said.

  I went to Europe for the first time over the summer and for the first time, I was introduced to a wide range of quality dress shoes not found in the Philippines. Since cost of these shoes were significant I did considerable research in what to buy, how to take care of them, and ultimately how it was made. I stumbled upon your blog and fell in love with craftsmanship and art, involved in something so useful as a shoe. 

   So much so that I started looking for places where I could learn the craft. I found a small factory in Marikina that I paid to let me work in their factory and ask help from their workers. I would show them certain blog posts and asked if they could teach me how to hand last, sew a welt, etc.. There I met wonderful people who before were shoemakers but had given up the trade. I quickly found out that most of Marikina, which had small workshops in every street corner, had almost given up making handmade shoes and were now importing their shoes. 

   Here I met Ading and Elsa, two shoemakers who used to make handmade shoes back in the 80's and we started Sapatero together. We wanted to see what would happen when you combine Filipino craftmanship coupled with world class materials. Your blog was a wonderful inspiration and a great starting point for us here in Sapatero. Thank you for your work.

And here are some pictures of them in their workshop


And their work.


One question was where to get high quality calf skin in South East Asia. Can anyone help?

We wish Raymond and his fellow workers the very best of luck and feel proud that we had a small part to play in inspiring a new shoemaking business.

And on to toe plates. Here is how we do it.

First off, mark the position of your plates on both shoes. If they are metal ones, you have to do them to fit. Otherwise, you can make them any size you want.


Then cut along the line to the depth of your plate. But not through the stitches!


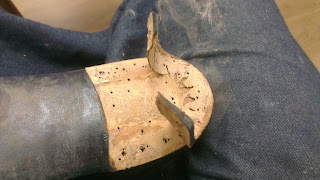
Cut away like this at an angle to reveal the cut better.


Cut away a space for the plate. If you are very organised, you can rebate this space before you stitch the sole on. I am not very organised.


Apply contact adhesive to both surfaces.


Glue on the plates and trim carefully. We like to put in tacks because they stay on longer and we like the retro look. Et voila! Toe plates.


Just a word of advice now to those of you who stick your grubby little fingers into the back of your shoes when you put them on. And also to those of you who kick them off again with the other foot. And especially to those who do both.

DON'T DO IT!

This is what happens. It makes the stiffener soft and the heel saggy. And it collapses the stiffener, both at the top and at the bottom. Big no nice!


And so we come to the end of another riveting post. We hope you enjoyed it and/or found it useful. We always welcome your comments and feedback. In fact, it's what makes doing this blog worthwhile.

Until next week, happy shoemaking!

Friday, November 22, 2013

Lasts For Sale

Hello, dear shoefolk of the world.  Welcome back to your weekly fix of all things shoe. We hope you have had a productive week.

Following on from the last two weeks, here are the finished shoes, repaired, with new soles and new top pieces on the heels. And beautifully polished of course. Not quite good as new but a real transformation and they will have a good few years of life left in them.


 These are the socks from them which have nine year's wear and are in pretty good condition. I find it fascinating how the foot imprints into the leather. I also think it has lasted amazingly well. Leather is a fantastic material.


We have been having a well needed clear out and came across a large box of old and sadly unwanted lasts. So we have decided to sell them. We are going to start with our loyal readers to give you the first chance to grab them.

The following photos show the toe shapes and the caption says what the size and heel height are. Some are standard sized lasts and some are bespoke ones. All are wood and have been used to make shoes.  So it is a mixed bunch and they are sold as seen with no returns.
Some are old, some new. Some are Spanish but most are from England.

If you want a specific pair, email us at cd@carreducker.com with the Picture Number of the pair you want and a postal address. They cost £35 plus shipping anywhere in the world. Sample prices for shipping, depending on size, are:

UK £4 -£7
USA £18 - £29
Australia £19 - £31

Please ask for other countries

We will take PayPal only - destination address will be included in emails.

Picture 1, Men's lasts, size 9D, 3cm heel height

Picture 2, Ladies' lasts, size 6,5cm heel height

Picture 3, ladies' lasts, size 5.5, 3cm heel height

Picture 4, Ladies' lasts, size 9, 4.5cm heel height

Picture 5, ladies' lasts, sizes as shown, 3.5cm heel height

Picture 6, ladies lasts, size 7, 3.5cm heel height

Picture 7, Men's boot lasts, size 11, 2.3cm heel height

Picture 8, Ladies' lasts, size 10, 5.5cm heel height

Picture 9, Men's boot lasts, size 10, 2.3cm heel height

Picture 10, Ladies' lasts, size 8, 4cm heel height

Picture 11, Ladies' lasts, size 8, 4.5cm heel height

And so another post draws to an end. We hope you have enjoyed it and maybe want one of the pairs of lasts. Please get in touch.

And if you are a regular reader, please become a follower. It only takes a second and it helps us greatly. Thank you and, until next week, happy shoemaking!

Friday, November 15, 2013

Repairing Old Shoes 2

And here we are again. Friday morning and it's blog time, ladies and gentlemen. Welcome back one and all.

Last Saturday we were featured in Small Business Saturday which is set up by Amex to champion small businesses throughout the UK and to encourage people to spend their money with small companies. Because we are the backbone of the economy after all.

Last week's cliffhanger was our old pair of shoes that needed a re-sole and general service. We left you with the sole stitched on and the heel left to build.

And this is how you do it.

You have the sole attached.


And so to the heel.

You might need to skive it flat, it depends. Just look to see if there is doming on the sole. Don't skive in front of your heel marks.


Rebuilding the heel should now be easy because you saved the lifts form the original heel which should all be skived and fit properly.

Using paste and nails, reposition the split lift/rand.


Then reposition the heel lifts in the order that you took them off and facing the right way. Use paste and nails.


We put nails only in the last lift to make the shoes lighter, but you can put them in each lift if you prefer. Try to line up the lifts as closely to their original position as you can so that the heel stays the same shape.


Check whether the heel is flat. You might need to skive it a little but it should be ok. Then attach the top pieces with either neoprene and nails or paste and nails. It's up to you.

Trim any excess of the heel edge with your knife and also do the same on the sole edges.


Now you need to start the finishing. Firstly, rasp the heel and the sole edges.


Then wet and glass both areas.


Sand using 80, 120 paper.


We like to ink at this point to get good penetration into the leather.


Edges too. And the stitching on the welt.

Lastly we use the 240 grit paper on wet leather and in only one direction to get a really smooth finish.

Set the edges with your edge iron.


Glass and sand the sole and top piece. We use 120 and 240 to get a nice peachy finish.


Ink everything again if you are doing a black finish as with these shoes.


Burnish the sole and top piece by applying a layer of polish and then passing a warm heel iron over it. Hot enough to touch comfortably. If you do it too hot it will make marks which are hard to get rid of. This seals the polish and stops it rubbing off on white carpets. In theory.


The go over it with 3 layers of polish which you buff off in between each one. Rub hard to get rid of the burnishing marks. It should be smooth and shiny.


Apply some wax to the heel and edges to get a shiny finish. Burnish with a heel iron and the edge iron you used to set the edges. You will have to rub really hard with a flannel or cloth to remove most of the wax. But it will look lovely.


 These shoes could now be polished and given back to the customer, but this customer has toe plates, so next week we will show you how to do those.

Until then, happy shoemaking!


Friday, November 8, 2013

Repairing Old Shoes

Welcome back faithful readers, we love you guys. We are getting more and more page views per month and people are staying longer on the site, so we wanted to thank you for that. Makes it all worth it, I'd say. And if you have recently found us, welcome aboard and we hope you enjoy the ride.

Occasionally, (our shoes are very durable!) we get some old shoes back for repair. This is always an interesting moment because you can see how your making stands up to the way people walk in their shoes. This week we had three pairs back from one of our first customers from 2004. So these babies are 9 years old.


We assessed what needed doing and let the customer know. We only repair our own shoes, so it is not something we do very often. Two of these pairs needed a complete resole and one a general service which includes some or all of the following - top pieces, toe plates, laces, sticker sole and polish

We started with the simple wholecuts on the right. They were the most worn (and loved hopefully)


The sole was very worn, but still wearable. Notice the wear backwards from the joint - this means a new shank to give some more support.


You can see here how worn it was. This sole was originally a 1/4" but is now less than 3/16"


Before you start, you will need one of two things - the original lasts back in the shoes, or a pair of well fitting wooden trees. We use the bespoke trees we provide with the shoes.
The process starts with removing the heel. The top piece is thrown away and will be replaced with a new one.
Weirdly, some repairer he had used had put the top pieces on with the quarter rubber on the inside instead of the outside, so the leather had worn away, not the rubber part. Always go to someone who knows what they are doing!


Now to remove the heel. It is important to keep all the heel lifts as you remove them because you need them to build the heel again once you have stitched on a new sole. This way you can just put the heel back together and it will be balanced and correct. If you use new lifts, you have to do all the skiving and balancing again.
The general technique is to prise a lift at a corner with a screwdriver and then pull it off with some nippers. Be careful not to damage the lifts.
This is where you will be glad you used paste and nails not neoprene/contact adhesive. You always have to think about repairs when you are shoemaking.


Label the lifts L1, L2, L3 and R1, R2, R3 so that you know which is which. Store them safely.


Stop when you get to the split lift/rand.


Gently peel back the split lift/rand, but don't remove it completely.


Fold it back and nail it into position. This makes life much easier when you come to rebuild the heels.


Next you have to remove the sole. Usually the stitches are worn at the toe so you don't have to cut them. Once you have started the process, it is fairly easy. If need be, use the knife to cut the stitches but be very careful not to cut the welt.


Peel the sole back to the heel, like this. And then cut the sole at an angle like in the picture below. Make sure you have removed any nails first.


Remove any bits of stitches which show up above the welt so that the welt looks like this. Don't try to remove the stitches from the top of the welt. You will simply restitch over the top of them.
At this stage you should check the shank and the filler. We use leather shanks and we put a new one in to give it some extra rigidity. We used felt filler here and it was fine. Cork will need replacing after so long.


Soak and mellow your sole (you should have done this the day before really). Cut it out to size. You will need to cut a bevel at the heel area to match the one you cut on the original sole so that they dovetail together.
If you are making a sole to a specific thickness, you will need to skive the edge.


Hammer the sole with a flat headed hammer so that it lasts longer.


Glue it into place, making sire the heel join is neat. Put a few nails in to secure it


Trim it to size.


Cut your channel.


And stitch, baby, stitch! Remember to stitch through the original hole in the welt, otherwise the welt be be destroyed. Also, be careful when taking out the awl from the hole to avoid pulling out the original stitches and making the welt look fuzzy.


Next week we will build the heels and finish the repair. Until then, happy shoemaking!