
We have put in the foam and sent them back, so it has all ended well, but it just goes to show how important all the stages are in making bespoke shoes.
We have had some contact from an aspiring shoemaker and this week he sent us his first shoe. Considering he is self taught, with some help from our blog, the result is very impressive. So, to all of you shoemakers out there, you too can do it!

Matt (who made the above shoe) asked us to do a post about finishing the soles. Your wish is my command! So, here goes.
Here you have a shoe with the edges set and the heel finished. Time to finish the sole.

First off is to glass the sole. This takes off the top layer of the skin which is hard and impenetrable and would stop the ink staining the sole black.

You have to hold the glass at an angle of about 60 degrees leaning forwards and scrape in short movements. Over the channel near the edge, there tends to be a little ridge, which can make the glassing difficult. Also, depending on the leather, you can end up with tiny lines on the surface. Like this.

In this case, glass across the ridges 90 degrees to the direction you started with. Use a light touch and the lines should disappear. It is important that you get all the skin surface off.
The area around the heel breast is tricky and you need to use the pointed tip of the glass.


Glass the top piece too.

Next comes sanding. I like to use the 120 grit aluminium oxide paper that I used on the heel because it is a little less abrasive than a fresh piece. Sand lightly and concentrate on the parts where the lines are. I tend to sand in one direction, backwards and forwards. Others sand in circular motions. Experiment and decide what you prefer. A light touch is essential.

As you sand, all the blemishes should start to disappear.


Next comes two more grades of paper. We use foam sanding blocks available at DIY stores. These have 2 grades and are very useful. Also, as you use them, they get less abrasive and achieve a better finish.
Again, a light touch is needed.

It should look a little like this.
Note, however, that you can sand too much, and if you do, you will not get a good finish from the next stages. So don't do it too much. What is too much? Hard to tell you. Keep going till it is smooth and even, but stop when it is.

Next comes the ink/dye/stain. We use Quick Black or Brown made by WH&B from Algeos. I would be interested to hear from you about what other people use because they have changed the recipe and we don't like it as much.
Paint it on in even strokes with a fine paint brush. It has the effect of smoothing and hardening the surface.

Let it dry thoroughly and then apply a generous layer of shoe polish. Rub it in and let it dry for 5 minutes.

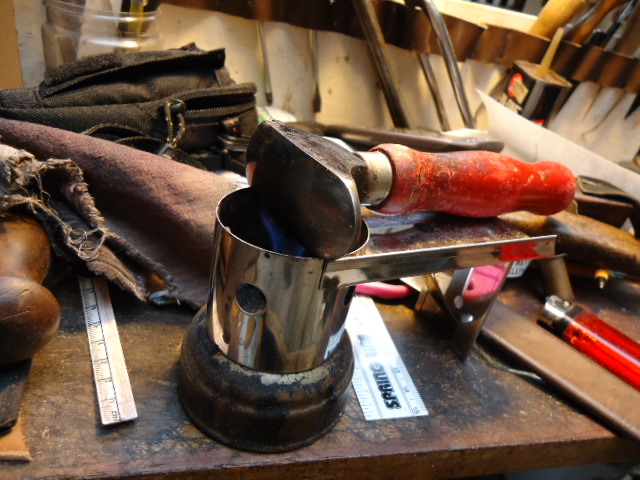
Next we burnish the polish with the heel iron. But it must be heated on your burner, but remain relatively cool or else you will get marks in the polish. Move the heel iron over the polish in even movements. It has the effect of making it shiny. It also prevents the polish coming off on people's expensive white carpets.

This is how it will look. The toe part is done, but the rest isn't.

You can see the little marks where the iron has been.

Now apply a regular coat of polish and rub it in hard. You want to generate some heat so that all the ironing marks are removed. The heat will do this. You will start to get a shine. We usually do 3 layers of polish but the more you do, the better the shine you will get.
Finally rub the surface with an old pair of tights or pop socks. This gives a final lustre to the finish.
It should look a little like this.

Next time I do one, I will show you a natural finish on the sole.
So, until then, happy shoemaking!