Well here are a pair of our signature Half-Cut shoes in just such a position.

First thing to do is to remove the laces. Carefully with a knife is what I do.

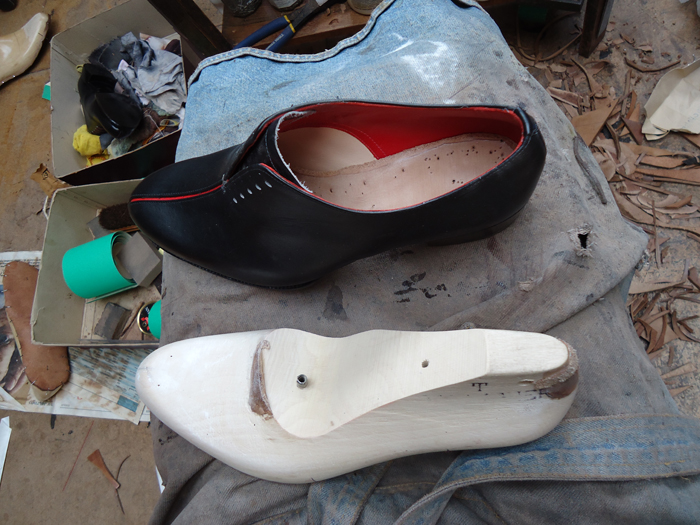
Lasts can be with a cone or a spring. This one has a cone, so the first thing is to remove it. Undo the screw and take it out.

Now you are ready to pull the last with a lasting hook. We made this one. Put the foot rest on the floor and the hook through the hole in the last. Holding the heel with both hands, pull the shoe up towards you. When you feel the last out of the heel, start pulling the shoe towards yourself and slide the last out. Be as quick as you can, to avoid creasing the waist of the sole.

And the last should come out easily, if you have used chalk or talcum powder.
If you have built your heel strongly, a few of the nails should be sticking up through the insole. This is no bad thing as it means the heel is strong and will not pull away from the shoe. But you need to get rid of them as they will hurt your feet.

Any really long ones, clip them off with nippers, and then hammer them flat with this special hammer. Hit them hard to sink them below the surface.

They should look like this.

In theory you could wear the shoes now, but they do not look great, so we put a sock in them. You would be surprised how much difference a sock can make to the fit, so use either a through sock (all the way to the toe) or a half sock. Use the same leather as the lining.
You will need to make a paper pattern with the last. Cut it out and test it inside the shoe for fit.


When it is fitting correctly, cut out the socks in leather. Remember to turn the pattern over to get a right and a left. You might need to make two patterns if the lasts are very different.

You will need to skive the end of the half sock to avoid an uncomfortable ridge.

We generally put in a piece of foam at the heel for extra comfort. Glue it in with rubber solution.

With the sock, we do it in two parts, the forepart first then the heel part. Put a generous amount of rubber solution onto the insole and also on the sock. Put it in straight away while the glue is wet. This allows you to move the sock around and position it correctly.

Like this.

Now lift the heel part up and put rubber solution on both surfaces. This time, let it dry for five minutes.

Glue it down, and, hey presto! The sock is inplace. It looks much better now. If the client has problems with his foot slippiong within the shoe, you can use the reverse of the leather to give more grip.

This shoe is now ready to be sent back to the last maker for the bespoke trees. This will take a couple of weeks, and then we can deliver them to our client who is very keen to get his feet into his beautifully finished bespoke shoes.
That's all folks! Until next week, happy shoemaking!